Enable high availability
Yugabyte’s distributed architecture enables database clusters (also referred to as universes) to have extremely high availability.
YugabyteDB Anywhere's high availability is an active standby model for multiple instances in a cluster with asynchronous replication. Your YugabyteDB Anywhere data is replicated across multiple virtual machines (VMs), ensuring that you can recover quickly from a VM failure and continue to manage and monitor your universes, with your configuration and metrics data intact.
Each high-availability cluster includes a single active YugabyteDB Anywhere instance and at least one standby YugabyteDB Anywhere instance, configured as follows:
-
The active instance runs normally, but also pushes out backups of its state to all of the standby instances in the high-availability cluster.
-
A standby instance is completely passive while in standby mode and cannot be used for managing or monitoring clusters until you manually promote it to active.
Backups from the active instance are periodically taken and pushed to followers at a user-configurable frequency (no more than once per minute). The active instance also creates and sends one-off backups to standby instances whenever a task completes (such as creating a new universe). Metrics are duplicated to standby instances using Prometheus federation. Standby instances retain ten most recent backups on disk.
When you promote a standby instance to active, YugabyteDB Anywhere restores your selected backup, and automatically demotes the previous active instance to standby mode.
Prerequisites
Before configuring the high-availability cluster, ensure that you have the following:
- YugabyteDB Anywhere versioin 2.5.3.1 or later.
- Multiple YugabyteDB Anywhere instances to be used in the high-availability cluster.
- YugabyteDB Anywhere VMs can connect to each other over the port that YugabyteDB Anywhere is typically reachable (port 80 and 443, for example).
- All YugabyteDB Anywhere instances are running the same version of YugabyteDB Anywhere software. Note that it is generally recommended to upgrade all YugabyteDB Anywhere instances in the high-availability cluster at approximately the same time.
Configure the active instance
You can configure the active instance as follows:
-
Navigate to Admin and make sure that High Availability > Replication Configuration > Active is selected, as per the following illustration:

-
Enter the instance’s IP address or hostname, including the HTTP or HTTPS protocol prefix and port if you are not using the default of 80 or 443.
-
Click Generate Key and copy the shared key.
-
Select your desired replication frequency, in minutes.
In most cases, you do not need to replicate very often. A replication interval of 5-10 minutes is recommended. For testing purposes, a 1-minute interval is more convenient.
-
Click Create.
-
Switch to Instance Configuration.
The address for this instance should be the only information under Instances.
Your active instance is now configured.
Configure standby instances
Once the active instance has been configured, you can configure one or more standby instances by repeating the following steps for each standby instance you wish to add to the high-availability cluster:
-
Navigate to Admin > High Availability > Replication Configuration and select Standby, as per the following illustration:
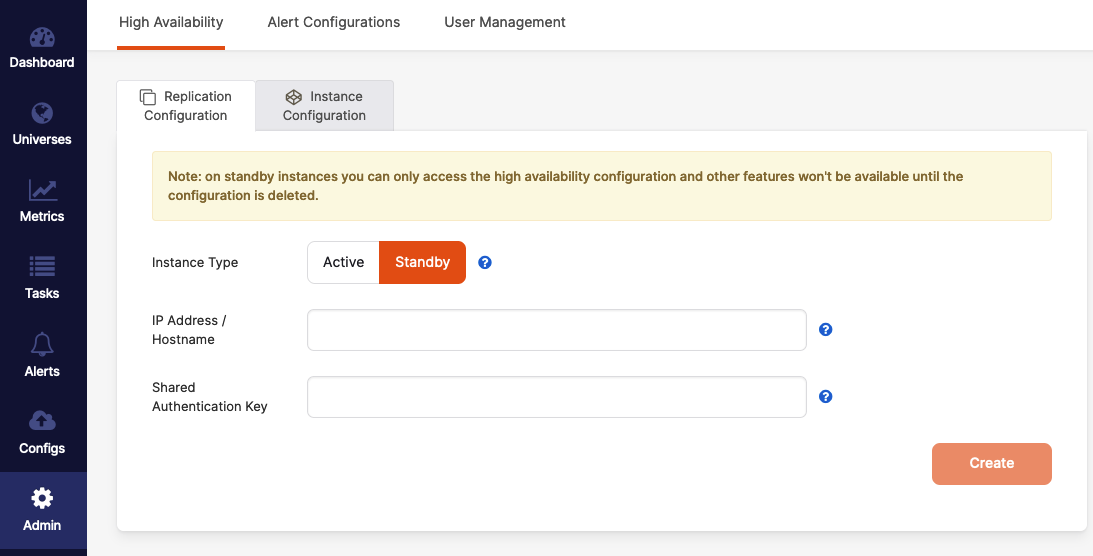
-
Enter the instance's IP address or hostname, including the HTTP or HTTPS protocol prefix and port if you are not using the default of 80 or 443.
-
Paste the shared authentication key from the active instance into the Shared Authentication Key field.
-
Switch to the active instance, and then switch to Instance Configuration. Click Add Instance, enter the new standby instance's IP address or hostname, including the HTTP or HTTPS protocol prefix and port if you are not using the default of 80 or 443, and then click Continue on the Add Standby Instance dialog.
-
Switch back to the new standby instance, wait for a replication interval to pass, and then refresh the page. The other instances in the high-availability cluster should now appear in the list of instances.
Your standby instances are now configured.
Promote a standby instance to active
You can make a standby instance active as follows:
-
Open Replication Configuration of the standby instance that you wish to promote to active and click Make Active.
-
Use the Make Active dialog to select the backup from which you want to restore (in most cases, you should choose the most recent backup in the vast majority of cases) and enable Confirm promotion.
-
Click Continue.
The restore take a few seconds, after which expect to be logged out. -
Login using credentials that you had configured on the previously active instance.
You should be able to see that all of the data has been restored into the instance, including universes, users, metrics, alerts, task history, cloud providers, and so on.
Remove a standby instance
To remove a standby instance from a high-availability cluster, you need to remove it from the active instance's list, and then delete the configuration from the instance to be removed, as follows:
-
On the active instance's list, click Delete Instance for the standby instance to be removed.
-
On the standby instance you wish to remove from the high-availability cluster, click Delete Configuration on the Admin tab.
The standby instance is now a standalone instance again.
After you have returned a standby instance to standalone mode, the information on the instance is likely to be out of date, which can lead to incorrect behavior. It is recommended to wipe out the state information before using it in standalone mode. For assistance with resetting the state of a standby instance that you removed from a high-availability cluster, contact Yugabyte Support.