Configure the on-premises cloud provider
You can configure the on-premises cloud provider for YugabyteDB using YugabyteDB Anywhere. If no cloud providers are configured, the main Dashboard prompts you to configure at least one cloud provider.
Configure the on-premises provider
Configuring the on-premises provider consists of a number of steps.
Complete the provider information
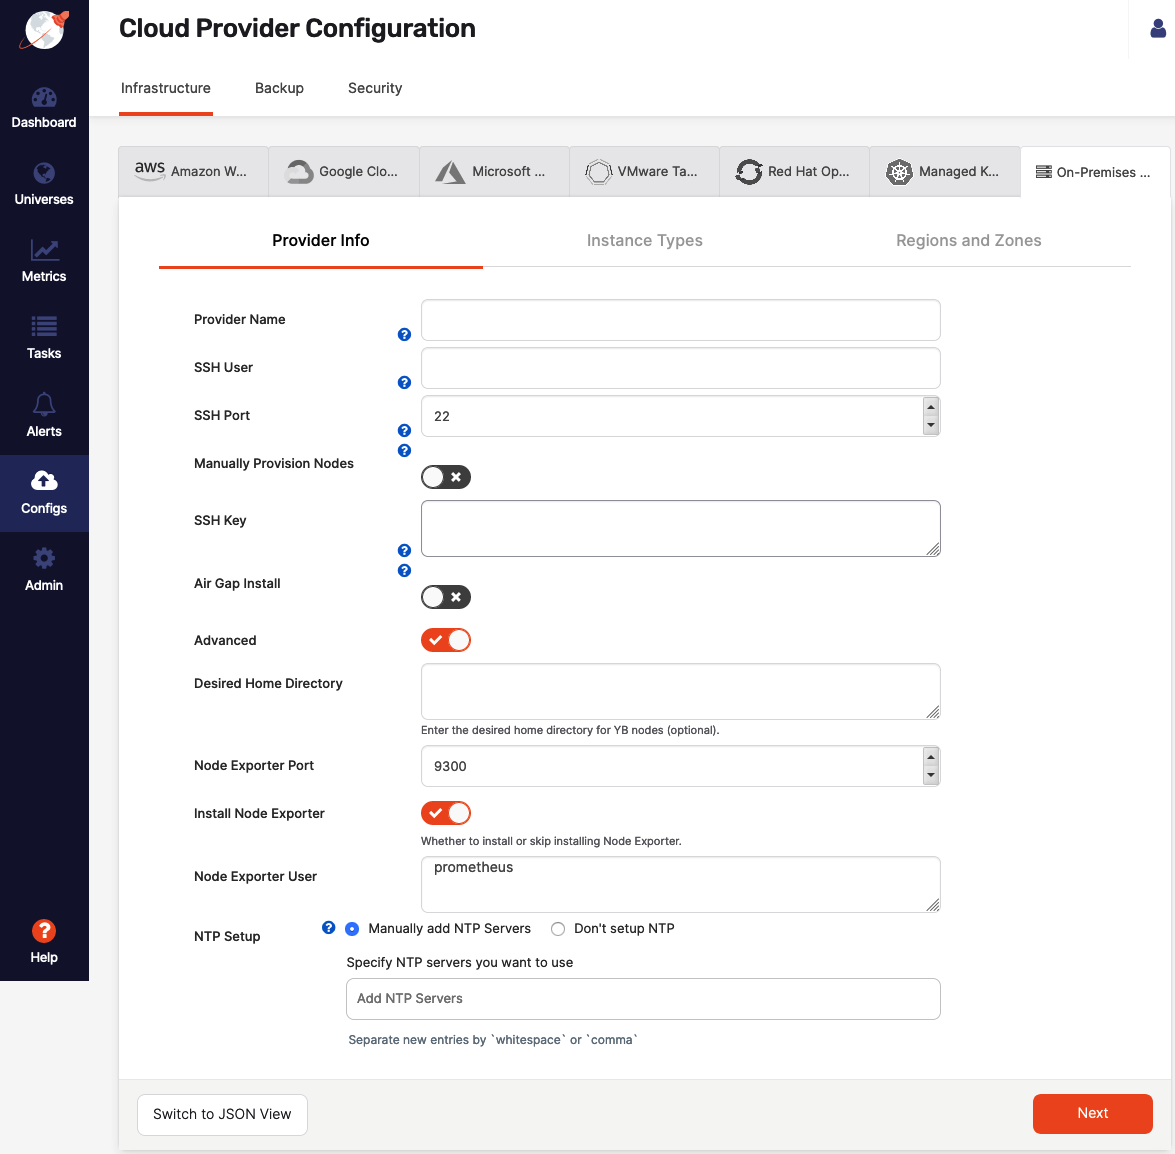
You need to navigate to Configs > Infrastructure > On-Premises Datacenters, click either Add Configuration or Edit Provider, and then complete the fields of the Provider Info form shown in the following illustration:
-
In the Provider Name field, supply the provider name, which is an internal tag that helps with organizing your providers, so you know where you want to deploy your YugabyteDB universes.
-
In the SSH User field, enter the name of the user that has SSH privileges on your instances. This is required because to provision on-premises nodes with YugabyteDB, YugabyteDB Anywhere needs SSH access to these nodes. Unless you plan to provision the database nodes manually, the user needs to have password-free sudo permissions to complete a few tasks.
If the SSH user requires a password for sudo access or the SSH user does not have sudo access, follow the steps described in Manually provision nodes.
-
In the SSH Port field, provide the port number of SSH client connections.
-
Enable the Manually Provision Nodes field if you choose to manually set up your database nodes. Otherwise, YugabyteDB Anywhere will use the sudo user to set up YugabyteDB nodes. For manual provisioning, you would be prompted to run a Python script at a later stage or to run a set of commands on the database nodes.
If any of the following statements are applicable to your use case, you need to provision the nodes manually:
- Preprovisioned
yugabyte:yugabyteuser and group. - Sudo user requires a password.
- The SSH user is not a sudo user.
- Preprovisioned
-
Use the SSH Key field to enter the full content of the private key available to the SSH user for gaining access via SSH into your instances.
Ensure that the SSH key is pasted correctly in the RSA format: you need to paste the SSH RSA PEM key entry including the RSA key header such as
-----BEGIN RSA PRIVATE KEY-----and footer such as-----END RSA PRIVATE KEY-----. -
Enable the Air Gap Install field if you want the installation to run in an air-gapped mode without expecting any internet access.
-
Optionally, you may enable Advanced and complete the following:
- Use the Desired Home Directory field to specify the home directory of the
yugabyteuser. The default value is/home/yugabyte. - Use the Node Exporter Port field to specify the port number for the node exporter. The default value is 9300.
- Enable Install Node Exporter if you want the node exporter installed. You can skip this step if you have node exporter already installed on the nodes. Ensure you have provided the correct port number for skipping the installation.
- The Node Exporter User field allows you to override the default Prometheus user. This is useful when the user is preprovisioned on nodes (when the user creation is disabled). If overridden, the installer checks whether or not the user exists and creates the user if it does not exist.
- Use the Desired Home Directory field to specify the home directory of the
-
NTP Setup lets you to customize the Network Time Protocol server, as follows:
- Select Manually add NTP Servers to provide your own NTP servers and allow the cluster nodes to connect to those NTP servers.
- Select Don’t set up NTP to prevent YugabyteDB Anywhere from performing any NTP configuration on the cluster nodes. For data consistency, ensure that NTP is correctly configured on your machine image.
Configure hardware for YugabyteDB nodes
Complete the Instance Types fields, as per the following illustration, to provide node hardware configuration (CPU, memory, and volume information):
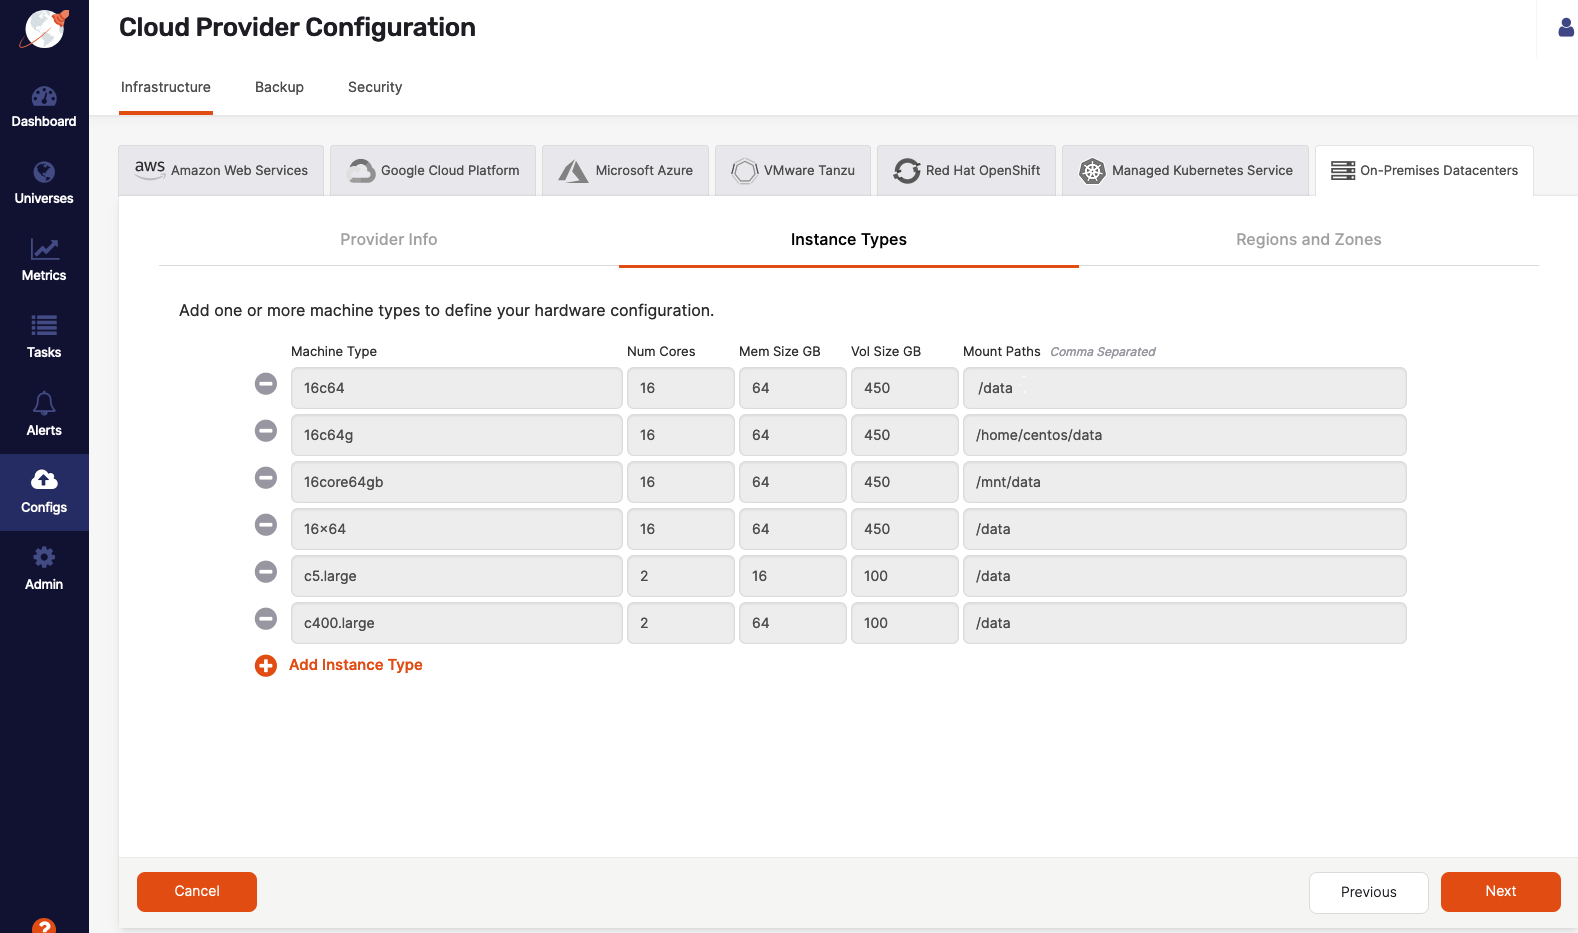
- Use the Machine Type field to define a value to be used internally as an identifier in the Instance Type universe field.
- Use the Num Cores field to define the number of cores to be assigned to a node.
- Use the Mem Size GB field to define the memory allocation of a node.
- Use the Vol Size GB field to define the disk volume of a node.
- Use the Mount Paths field to define a mount point with enough space to contain your node density. Use
/data. If you have multiple drives, add these as a comma-separated list, such as, for example,/mnt/d0,/mnt/d1.
Define regions and zones
Complete the Regions and Zones fields, as per the following illustration, to provide the location of YugabyteDB nodes:
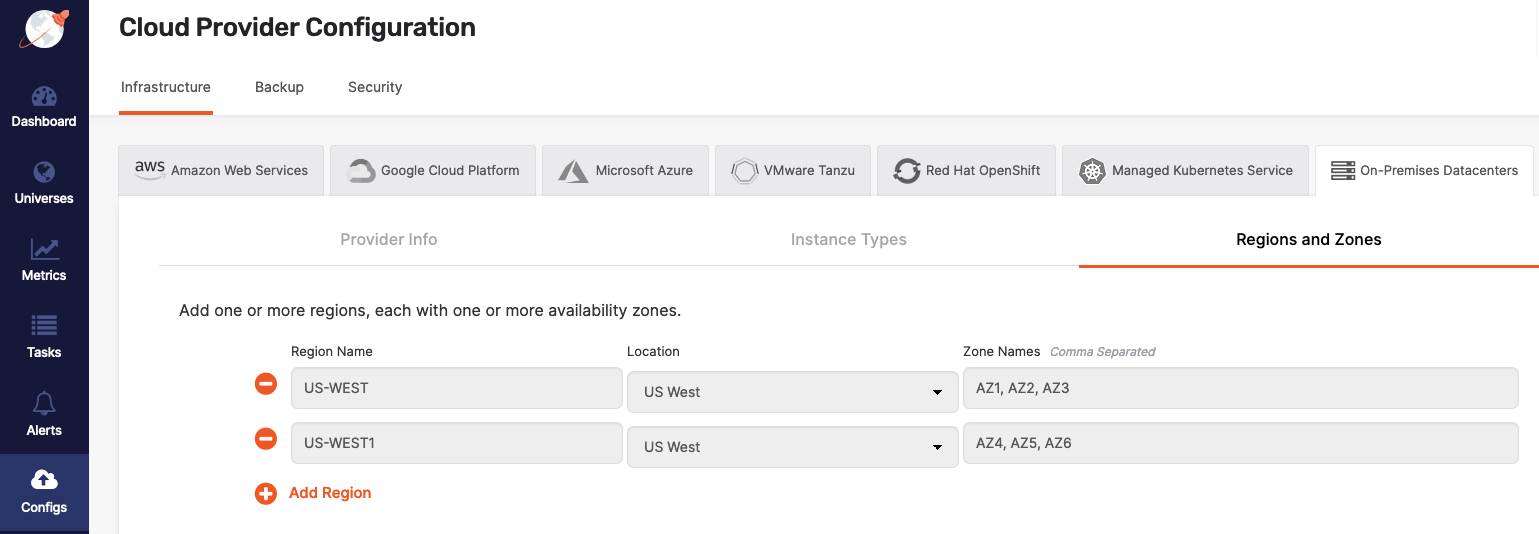
YugabyteDB Anywhere will use these values during the universe creation.
Add YugabyteDB nodes
After finishing the provider configuration, click Manage Instances to provision as many nodes as your application requires.
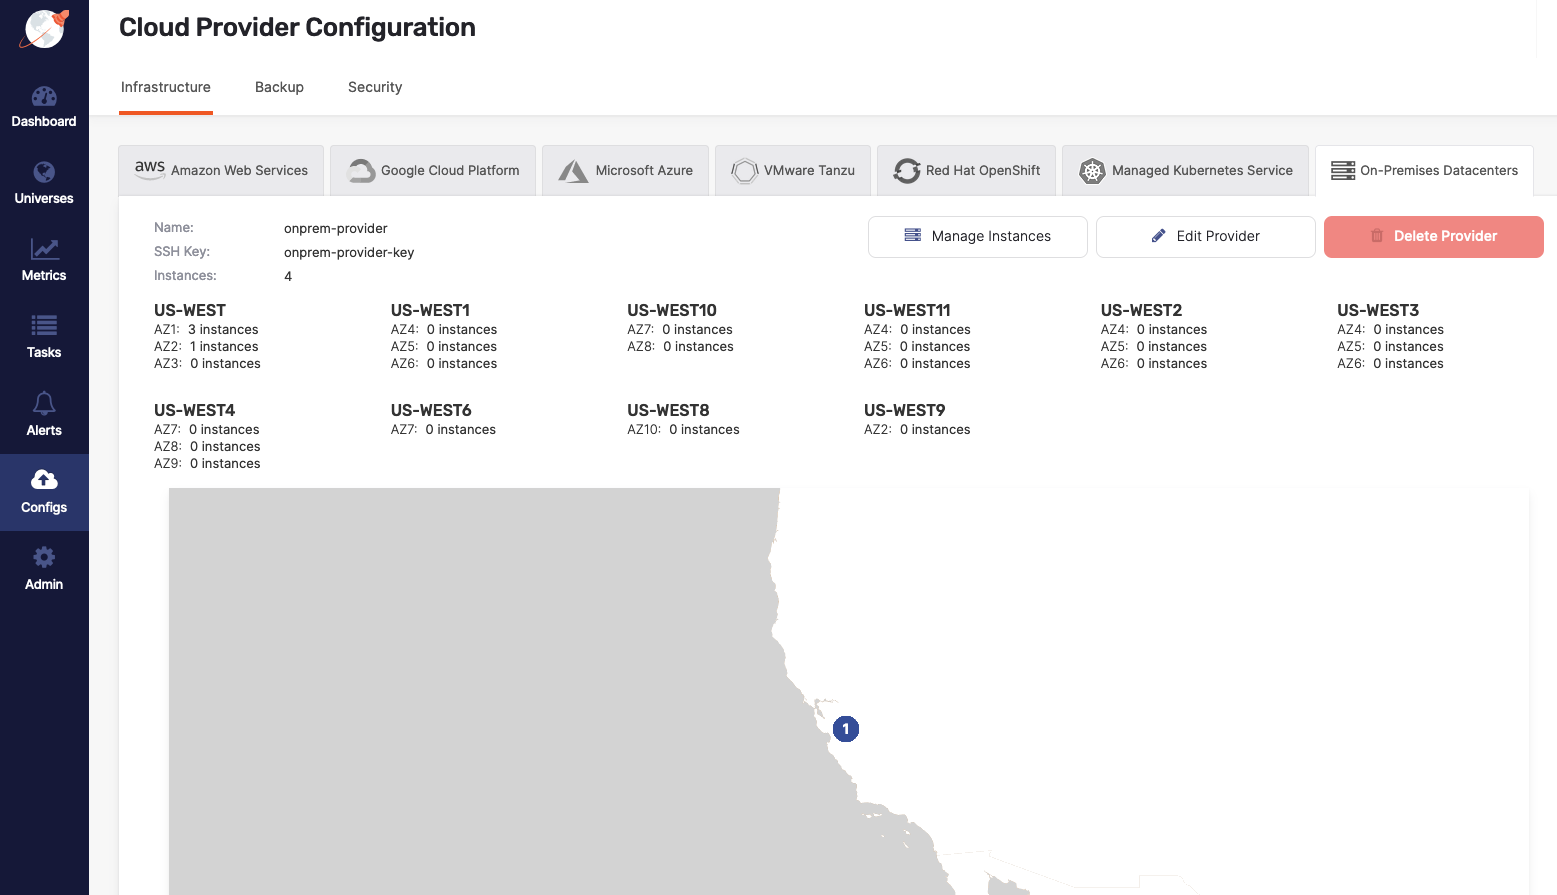
For each node you want to add, click Add Instances to add a YugabyteDB node. You can use DNS names or IP addresses when adding instances (instance ID is an optional user-defined identifier).
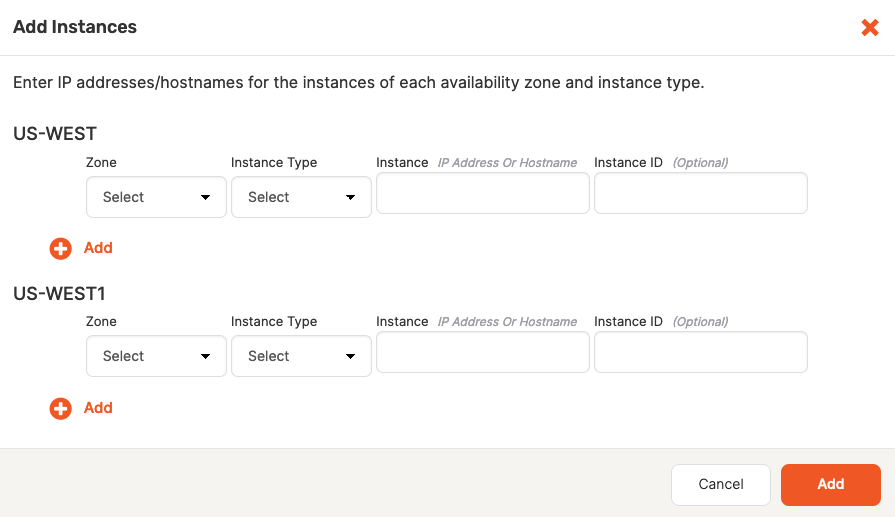
Note that if you provide a hostname, the universe might experience issues communicating. To resolve this, you need to delete the failed universe and then recreate it with the use_node_hostname_for_local_tserver g-flag enabled.
Provision nodes manually
To provision your nodes manually, you have the following two options:
- If the SSH user you provided has sudo privileges but requires a password, you can run the preprovisioning script.
- If the SSH user does not have any sudo privileges, you need to set up the database nodes manually.
Running the preprovisioning script
This step is only required if you set Manually Provision Nodes to true and the SSH user has sudo privileges which require a password; otherwise you skip this step.
You can manually provision each node using the preprovisioning Python script, as follows:
-
Login to YugabyteDB Anywhere virtual machine via SSH.
-
Access the docker
yugawarecontainer, as follows:sudo docker exec -it yugaware bash -
Copy and paste the Python script prompted via the UI and substitute for a node IP address and mount points. Optionally, use the
--ask_passwordflag if the sudo user requires password authentication, as follows:bash-4.4# /opt/yugabyte/yugaware/data/provision/9cf26f3b-4c7c-451a-880d-593f2f76efce/provision_instance.py --ip 10.9.116.65 --mount_points /data --ask_passwordExpect the following output and prompt:
Executing provision now for instance with IP 10.9.116.65... SUDO password: -
Wait for the script to finish successfully.
-
Repeat step 3 for every node that will participate in the universe.
This completes the on-premises cloud provider configuration. You can proceed to Configure the backup target or Create deployments.
Setting up database nodes manually
This step is only required if you set Manually Provision Nodes to true and the SSH user does not have sudo privileges at all; otherwise you skip this step.
If the SSH user configured in the on-premises provider does not have sudo privileges, then you can set up each of the database nodes manually. Note that you need access to a user with sudo privileges in order to complete these steps.
For each node, perform the following:
- Set up time synchronization
- Open incoming TCP ports
- Preprovision the node
- Install Prometheus node exporter
- Install backup utilities
- Set crontab permissions
- Install systemd-related database service unit files (optional)
Set up time synchronization
A local Network Time Protocol (NTP) server or equivalent must be available.
Ensure an NTP-compatible time service client is installed in the node OS (chrony is installed by default in the standard CentOS 7 instance used in this example). Then, configure the time service client to use the available time server. The procedure includes this step and assumes chrony is the installed client.
Open incoming TCP/IP ports
Database servers need incoming TCP/IP access enabled to the following ports, for communications between themselves and YugabyteDB Anywhere:
| Protocol | Port | Description |
|---|---|---|
| TCP | 22 | SSH (for automatic administration) |
| TCP | 5433 | YSQL client |
| TCP | 6379 | YEDIS client |
| TCP | 7000 | YB master webserver |
| TCP | 7100 | YB master RPC |
| TCP | 9000 | YB tablet server webserver |
| TCP | 9042 | YCQL client |
| TCP | 9090 | Prometheus server |
| TCP | 9100 | YB tablet server RPC |
| TCP | 9300 | Prometheus node exporter |
| TCP | 12000 | YCQL HTTP (for DB statistics gathering) |
| TCP | 13000 | YSQL HTTP (for DB statistics gathering) |
The preceding table is based on the information on the default ports page.
Preprovision nodes manually
This process carries out all provisioning tasks on the database nodes which require elevated privileges. Once the database nodes have been prepared in this way, the universe creation process from YugabyteDB Anywhere will connect with the nodes only via the yugabyte user, and not require any elevation of privileges to deploy and operate the YugabyteDB universe.
Physical nodes (or cloud instances) are installed with a standard Centos 7 server image. The following steps are to be performed on each physical node, prior to universe creation:
-
Login to each database node as a user with sudo enabled (the
centosuser in centos7 images). -
Add the following line to
/etc/chrony.conf(sudo is required):server <your-time-server-IP-address> prefer iburst
Then, run the following command:sudo chronyc makestep # (force instant sync to NTP server) -
Add a new
yugabyte:yugabyteuser and group with the default login shell/bin/bashthat you set via the-sflag (sudo is required):sudo useradd -s /bin/bash -m yugabyte # (add user yugabyte and create /home/yugabyte) sudo passwd yugabyte # (add a password to the yugabyte user) sudo su - yugabyte # (change to yugabyte user for execution of next steps)
Ensure that the
yugabyteuser has permissions to SSH into the YugabyteDB nodes (as defined in/etc/ssh/sshd_config). -
Copy the SSH public key to each DB node.
This public key should correspond to the private key entered into the YugabyteDB Anywhere provider. -
Run the following commands as the
yugabyteuser, after copying the SSH public key file to the user home directory:cd ~yugabyte mkdir .ssh chmod 700 .ssh cat <pubkey file> >> .ssh/authorized_keys chmod 400 .ssh/authorized_keys exit # (exit from the yugabyte user back to previous user) -
Add the following lines to the
/etc/security/limits.conffile (sudo is required):* - core unlimited * - data unlimited * - fsize unlimited * - sigpending 119934 * - memlock 64 * - rss unlimited * - nofile 1048576 * - msgqueue 819200 * - stack 8192 * - cpu unlimited * - nproc 12000 * - locks unlimited -
Modify the following line in the
/etc/security/limits.d/20-nproc.conffile (sudo is required):* soft nproc 12000 -
Install the rsync and OpenSSL packages (sudo is required).
Note that most Linux distributions include rsync and OpenSSL. If your distribution is missing these packages, install them using the following commands:sudo yum install openssl sudo yum install rsync
For airgapped environments, make sure your Yum repository mirror contains these packages. -
If running on a virtual machine, execute the following to tune kernel settings (sudo is required):
sudo bash -c 'sysctl vm.swappiness=0 >> /etc/sysctl.conf' sysctl kernel.core_pattern=/home/yugabyte/cores/core_%e.%p >> /etc/sysctl.conf -
Perform the following to prepare and mount the data volume (separate partition for database data) (sudo is required):
-
List the available storage volumes, as follows:
lsblk -
Perform the following steps for each available volume (all listed volumes other than the root volume):
sudo mkdir /data # (or /data1, /data2 etc) sudo mkfs -t xfs /dev/nvme1n1 # (create xfs filesystem over entire volume) sudo vi /etc/fstab -
Add the following line to
/etc/fstab:/dev/nvme1n1 /data xfs noatime 0 0 -
Exit from vi, and continue, as follows:
sudo mount -av # (mounts the new volume using the fstab entry, to validate)
sudo chown yugabyte:yugabyte /data
sudo chmod 755 /data
-
Install Prometheus node exporter
For YugabyteDB Anywhere versions 2.8 and later, download the 1.3.1 version of the Prometheus node exporter, as follows:
wget https://github.com/prometheus/node_exporter/releases/download/v1.3.1/node_exporter-1.3.1.linux-amd64.tar.gz
For YugabyteDB Anywhere versions prior to 2.8, download the 0.13.0 version of the exporter, as follows:
$ wget https://github.com/prometheus/node_exporter/releases/download/v0.13.0/node_exporter-0.13.0.linux-amd64.tar.gz
If you are doing an airgapped installation, download the node exporter using a computer connected to the internet and copy it over to the database nodes.
Note that the instructions are for the 0.13.0 version. The same instructions are applicable to the 1.3.1 version, but you need to use the correct file name.
On each node, perform the following as a user with sudo access:
-
Copy the
node_exporter-....tar.gzpackage file that you downloaded into the/tmpdirectory on each of the YugabyteDB nodes. Ensure this file is readable by thecentosuser on each node (or another user with sudo privileges). -
Run the following commands (sudo required):
sudo mkdir /opt/prometheus sudo mkdir /etc/prometheus sudo mkdir /var/log/prometheus sudo mkdir /var/run/prometheus sudo mv /tmp/node_exporter-0.13.0.linux-amd64.tar /opt/prometheus sudo adduser prometheus # (also adds group “prometheus”) sudo chown -R prometheus:prometheus /opt/prometheus sudo chown -R prometheus:prometheus /etc/prometheus sudo chown -R prometheus:prometheus /var/log/prometheus sudo chown -R prometheus:prometheus /var/run/prometheus sudo chmod +r /opt/prometheus/node_exporter-0.13.0.linux-amd64.tar sudo su - prometheus (user session is now as user “prometheus”) -
Run the following commands as user
prometheus:cd /opt/prometheus tar zxf node_exporter-0.13.0.linux-amd64.tar.gz exit # (exit from prometheus user back to previous user) -
Edit the following file (sudo required):
sudo vi /etc/systemd/system/node_exporter.service
Add the following to/etc/systemd/system/node_exporter.service:[Unit] Description=node_exporter - Exporter for machine metrics. Documentation=https://github.com/William-Yeh/ansible-prometheus After=network.target [Install] WantedBy=multi-user.target [Service] Type=simple #ExecStartPre=/bin/sh -c " mkdir -p '/var/run/prometheus' '/var/log/prometheus' " #ExecStartPre=/bin/sh -c " chown -R prometheus '/var/run/prometheus' '/var/log/prometheus' " #PIDFile=/var/run/prometheus/node_exporter.pid User=prometheus Group=prometheus ExecStart=/opt/prometheus/node_exporter-0.13.0.linux-amd64/node_exporter --web.listen-address=:9300 --collector.textfile.directory=/tmp/yugabyte/metrics -
Exit from vi, and continue, as follows (sudo required):
sudo systemctl daemon-reload sudo systemctl enable node_exporter sudo systemctl start node_exporter -
Check the status of the
node_exporterservice with the following command:sudo systemctl status node_exporter
Install backup utilities
YugabyteDB Anywhere supports backing up YugabyteDB to Amazon S3, Azure Storage, Google Cloud Storage, and Network File System (NFS). For more information, see Configure backup storage.
You can install the backup utility for the backup storage you plan to use, as follows:
-
NFS: Install rsync, which YugabyteDB Anywhere uses to perform NFS backups installed during one of the previous steps.
-
Amazon S3: Install s3cmd, on which YugabyteDB Anywhere relies to support copying backups to Amazon S3. You have the following installation options:
-
For a regular installation, execute the following:
sudo yum install s3cmd -
For an airgapped installation, copy
/opt/third-party/s3cmd-2.0.1.tar.gzfrom the YugabyteDB Anywhere node to the database node, and then extract it into the/usr/localdirectory on the database node, as follows:cd /usr/local sudo tar xvfz path-to-s3cmd-2.0.1.tar.gz sudo ln -s /usr/local/s3cmd-2.0.1/s3cmd /usr/local/bin/s3cmd
-
-
Azure Storage: Install azcopy using one of the following options:
-
Download
azcopy_linux_amd64_10.13.0.tar.gzusing the following command:wget https://azcopyvnext.azureedge.net/release20211027/azcopy_linux_amd64_10.13.0.tar.gz -
For airgapped installations, copy
/opt/third-party/azcopy_linux_amd64_10.13.0.tar.gzfrom the YugabyteDB Anywhere node, as follows:cd /usr/local sudo tar xfz path-to-azcopy_linux_amd64_10.13.0.tar.gz -C /usr/local/bin azcopy_linux_amd64_10.13.0/azcopy --strip-components 1
-
-
Google Cloud Storage: Install gsutil using one of the following options:
-
Download
gsutil_4.60.tar.gzusing the following command:wget https://storage.googleapis.com/pub/gsutil_4.60.tar.gz -
For airgapped installations, copy
/opt/third-party/gsutil_4.60.tar.gzfrom the YugabyteDB Anywhere node, as follows:cd /usr/local sudo tar xvfz gsutil_4.60.tar.gz sudo ln -s /usr/local/gsutil/gsutil /usr/local/bin/gsutil
-
Set crontab permissions
YugabyteDB Anywhere supports performing YugabyteDB liveness checks, log file management, and core file management using cron jobs.
Note that sudo is required to set up this service.
If YugabyteDB Anywhere will be using cron jobs, ensure that the yugabyte user is allowed to run crontab:
- If you are using the
cron.allowfile to manage crontab access, add theyugabyteuser to this file. - If you are using the
cron.denyfile, remove theyugabyteuser from this file.
If you are not using either file, no changes are required.
You have finished configuring your on-premises cloud provider. Proceed to Configure the backup target or Create deployments.
Install systemd-related database service unit files
As an alternative to setting crontab permissions, you can install systemd-specific database service unit files, as follows:
-
Enable the
yugabyteuser to run the following commands as sudo or root:yugabyte ALL=(ALL:ALL) NOPASSWD: /bin/systemctl start yb-master, \ /bin/systemctl stop yb-master, \ /bin/systemctl restart yb-master, \ /bin/systemctl enable yb-master, \ /bin/systemctl disable yb-master, \ /bin/systemctl start yb-tserver, \ /bin/systemctl stop yb-tserver, \ /bin/systemctl restart yb-tserver, \ /bin/systemctl enable yb-tserver, \ /bin/systemctl disable yb-tserver, \ /bin/systemctl start yb-zip_purge_yb_logs.timer, \ /bin/systemctl stop yb-zip_purge_yb_logs.timer, \ /bin/systemctl restart yb-zip_purge_yb_logs.timer, \ /bin/systemctl enable yb-zip_purge_yb_logs.timer, \ /bin/systemctl disable yb-zip_purge_yb_logs.timer, \ /bin/systemctl start yb-clean_cores.timer, \ /bin/systemctl stop yb-clean_cores.timer, \ /bin/systemctl restart yb-clean_cores.timer, \ /bin/systemctl enable yb-clean_cores.timer, \ /bin/systemctl disable yb-clean_cores.timer, \ /bin/systemctl start yb-collect_metrics.timer, \ /bin/systemctl stop yb-collect_metrics.timer, \ /bin/systemctl restart yb-collect_metrics.timer, \ /bin/systemctl enable yb-collect_metrics.timer, \ /bin/systemctl disable yb-collect_metrics.timer, \ /bin/systemctl start yb-zip_purge_yb_logs, \ /bin/systemctl stop yb-zip_purge_yb_logs, \ /bin/systemctl restart yb-zip_purge_yb_logs, \ /bin/systemctl enable yb-zip_purge_yb_logs, \ /bin/systemctl disable yb-zip_purge_yb_logs, \ /bin/systemctl start yb-clean_cores, \ /bin/systemctl stop yb-clean_cores, \ /bin/systemctl restart yb-clean_cores, \ /bin/systemctl enable yb-clean_cores, \ /bin/systemctl disable yb-clean_cores, \ /bin/systemctl start yb-collect_metrics, \ /bin/systemctl stop yb-collect_metrics, \ /bin/systemctl restart yb-collect_metrics, \ /bin/systemctl enable yb-collect_metrics, \ /bin/systemctl disable yb-collect_metrics, \ /bin/systemctl daemon-reload -
Ensure that you have root access and add the following service and timer files to the
/etc/systemd/systemdirectory (set their ownerships to theyugabyteuser and 0644 permissions):yb-master.service[Unit] Description=Yugabyte master service Requires=network-online.target After=network.target network-online.target multi-user.target StartLimitInterval=100 StartLimitBurst=10 [Path] PathExists=/home/yugabyte/master/bin/yb-master PathExists=/home/yugabyte/master/conf/server.conf [Service] User=yugabyte Group=yugabyte # Start ExecStart=/home/yugabyte/master/bin/yb-master --flagfile /home/yugabyte/master/conf/server.conf Restart=on-failure RestartSec=5 # Stop -> SIGTERM - 10s - SIGKILL (if not stopped) [matches existing cron behavior] KillMode=process TimeoutStopFailureMode=terminate KillSignal=SIGTERM TimeoutStopSec=10 FinalKillSignal=SIGKILL # Logs StandardOutput=syslog StandardError=syslog # ulimit LimitCORE=infinity LimitNOFILE=1048576 LimitNPROC=12000 [Install] WantedBy=default.targetyb-tserver.service[Unit] Description=Yugabyte tserver service Requires=network-online.target After=network.target network-online.target multi-user.target StartLimitInterval=100 StartLimitBurst=10 [Path] PathExists=/home/yugabyte/tserver/bin/yb-tserver PathExists=/home/yugabyte/tserver/conf/server.conf [Service] User=yugabyte Group=yugabyte # Start ExecStart=/home/yugabyte/tserver/bin/yb-tserver --flagfile /home/yugabyte/tserver/conf/server.conf Restart=on-failure RestartSec=5 # Stop -> SIGTERM - 10s - SIGKILL (if not stopped) [matches existing cron behavior] KillMode=process TimeoutStopFailureMode=terminate KillSignal=SIGTERM TimeoutStopSec=10 FinalKillSignal=SIGKILL # Logs StandardOutput=syslog StandardError=syslog # ulimit LimitCORE=infinity LimitNOFILE=1048576 LimitNPROC=12000 [Install] WantedBy=default.targetyb-zip_purge_yb_logs.service[Unit] Description=Yugabyte logs Wants=yb-zip_purge_yb_logs.timer [Service] User=yugabyte Group=yugabyte Type=oneshot WorkingDirectory=/home/yugabyte/bin ExecStart=/bin/sh /home/yugabyte/bin/zip_purge_yb_logs.sh [Install] WantedBy=multi-user.targetyb-zip_purge_yb_logs.timer[Unit] Description=Yugabyte logs Requires=yb-zip_purge_yb_logs.service [Timer] User=yugabyte Group=yugabyte Unit=yb-zip_purge_yb_logs.service # Run hourly at minute 0 (beginning) of every hour OnCalendar=00/1:00 [Install] WantedBy=timers.targetyb-clean_cores.service[Unit] Description=Yugabyte clean cores Wants=yb-clean_cores.timer [Service] User=yugabyte Group=yugabyte Type=oneshot WorkingDirectory=/home/yugabyte/bin ExecStart=/bin/sh /home/yugabyte/bin/clean_cores.sh [Install] WantedBy=multi-user.targetyb-clean_cores.timer[Unit] Description=Yugabyte clean cores Requires=yb-clean_cores.service [Timer] User=yugabyte Group=yugabyte Unit=yb-clean_cores.service # Run every 10 minutes offset by 5 (5, 15, 25...) OnCalendar=*:0/10:30 [Install] WantedBy=timers.targetyb-collect_metrics.service[Unit] Description=Yugabyte collect metrics Wants=yb-collect_metrics.timer [Service] User=yugabyte Group=yugabyte Type=oneshot WorkingDirectory=/home/yugabyte/bin ExecStart=/bin/bash /home/yugabyte/bin/collect_metrics_wrapper.sh [Install] WantedBy=multi-user.targetyb-collect_metrics.timer[Unit] Description=Yugabyte collect metrics Requires=yb-collect_metrics.service [Timer] User=yugabyte Group=yugabyte Unit=yb-collect_metrics.service # Run every 1 minute OnCalendar=*:0/1:0 [Install] WantedBy=timers.target
Remove YugabyteDB components from the server
As described in Eliminate an unresponsive node, when a node enters an undesirable state, you can delete such node, with YugabyteDB Anywhere clearing up all the remaining artifacts except the prometheus and yugabyte user.
You can manually remove Yugabyte components from existing server images. Before attempting this, you have to determine whether or not YugabyteDB Anywhere is operational. If it is, you either need to delete the universe or delete the nodes from the universe.
In order to completely eliminate all traces of YugabyteDB Anywhere and configuration, you should consider reinstalling the operating system image (or rolling back to a previous image, if available).
Delete database server nodes
You can remove YugabyteDB components and configuration from the database server nodes as follows:
-
Login to the server node as the
yugabyteuser. -
Navigate to the
/home/yugabyte/bindirectory that contains a number of scripts includingyb-server-ctl.sh. The arguments set in this script allow you to perform various functions on the YugabyteDB processes running on the node. -
Execute the following command:
./bin/yb-server-ctl.sh clean-instance
This removes all YugabyteDB code and settings from the node, removing it from the Universe.
Note
If you cannot find thebin directory, it means YugabyteDB Anywhere already cleared it during a successful deletion of the universe.
You shoud also erase the data from the volume mounted under the /data subdirectory, unless this volume is to be permanently erased by the underlying storage subsystem when the volume is deleted.
To erase this data, execute the following commands from the centos user on the node (or any user with access to sudo):
sudo umount /data
sudo dd if=/dev/zero of=/dev/sdb bs=1M
The preceding commands assume the data volume is attached to the server as /dev/sdb.
If there is a requirement to remove the yugabyte user, execute the following command:
sudo userdel -r yugabyte
If there is a requirement to remove the prometheus user, execute the following command:
sudo rm -rf /opt/prometheus
You may now choose to reverse the system settings that you configured in Provision nodes manually.
Delete YugabyteDB Anywhere from the server
To remove YugabyteDB Anywhere and Replicated components from the host server, execute the following commands as the root user (or prepend sudo to each command) :
systemctl stop replicated replicated-ui replicated-operator
service replicated stop
service replicated-ui stop
service replicated-operator stop
docker stop replicated-premkit
docker stop replicated-statsd
docker rm -f replicated replicated-ui replicated-operator \ replicated-premkit replicated-statsd retraced-api retraced-processor \ retraced-cron retraced-nsqd retraced-postgres
docker images | grep "quay.io/replicated" | awk '{print $3}' | xargs sudo docker rmi -f
docker images | grep "registry.replicated.com/library/retraced" | awk '{print $3}' | xargs sudo docker rmi -f
yum remove -y replicated replicated-ui replicated-operator
rm -rf /var/lib/replicated* /etc/replicated* /etc/init/replicated* \ /etc/default/replicated* /etc/systemd/system/replicated* \ /etc/sysconfig/replicated* \ /etc/systemd/system/multi-user.target.wants/replicated* \ /run/replicated*
rpm -qa | grep -i docker
yum remove docker-ce
rpm -qa | grep -i docker
yum remove docker-ce-cli