Configure the Kubernetes cloud provider
This document describes how to configure the Kubernetes provider for YugabyteDB universes using YugabyteDB Anywhere. If no cloud providers are configured in YugabyteDB Anywhere yet, the main Dashboard page prompts you to configure at least one cloud provider.
Prerequisites
To run YugabyteDB universes on Kubernetes, all you need to provide in YugabyteDB Anywhere is your Kubernetes provider credentials. YugabyteDB Anywhere uses those credentials to automatically provision and de-provision the pods that run YugabyteDB.
Before you install YugabyteDB on a Kubernetes cluster, perform the following:
- Create a
yugabyte-platform-universe-managementservice account. - Create a
kubeconfigfile of the earlier-created service account to configure access to the Kubernetes cluster.
Service account
The secret of a service account can be used to generate a kubeconfig file. This account should not be deleted once it is in use by YugabyteDB Anywhere. namespace in the service account creation command can be replaced with the desired namespace in which to install YugabyteDB.
Run the following kubectl command to apply the YAML file:
kubectl apply -f https://raw.githubusercontent.com/yugabyte/charts/master/rbac/yugabyte-platform-universe-management-sa.yaml -n <namespace>
Expect the following output:
serviceaccount/yugabyte-platform-universe-management created
The next step is to grant access to this service account using ClusterRoles and Roles, as well as ClusterRoleBindings and RoleBindings, thus allowing it to manage the YugabyteDB universe's resources for you.
The namespace in the following commands needs to be replaced with the correct namespace of the previously created service account.
The tasks you can perform depend on your access level.
Global Admin can grant broad cluster level admin access by executing the following command:
curl -s https://raw.githubusercontent.com/yugabyte/charts/master/rbac/platform-global-admin.yaml \
  | sed "s/namespace: <SA_NAMESPACE>/namespace: <namespace>"/g \
  | kubectl apply -n <namespace> -f -
Global Restricted can grant access to only the specific cluster roles to create and manage YugabyteDB universes across all the namespaces in a cluster using the following command:
curl -s https://raw.githubusercontent.com/yugabyte/charts/master/rbac/platform-global.yaml \
  | sed "s/namespace: <SA_NAMESPACE>/namespace: <namespace>"/g \
  | kubectl apply -n <namespace> -f -
This contains ClusterRoles and ClusterRoleBindings for the required set of permissions.
The following command can be used to validate the service account:
kubectl auth can-i \
--as system:serviceaccount:<namespace>:yugabyte-platform-universe-management \
{get|create|delete|list} \
{namespaces|poddisruptionbudgets|services|statefulsets|secrets|pods|pvc}
Namespace Admin can grant namespace-level admin access by using the following command:
curl -s https://raw.githubusercontent.com/yugabyte/charts/master/rbac/platform-namespaced-admin.yaml \
  | sed "s/namespace: <SA_NAMESPACE>/namespace: <namespace>"/g \
  | kubectl apply -n <namespace> -f -
If you have multiple target namespaces, then you have to apply the YAML in all of them.
The following command can be used to validate the service account:
kubectl auth can-i \
--as system:serviceaccount:<namespace>:yugabyte-platform-universe-management \
{get|create|delete|list|patch} \
{namespaces|poddisruptionbudgets|services|statefulsets|secrets|pods|pvc}
Namespace Restricted can grant access to only the specific roles required to create and manage YugabyteDB universes in a particular namespace. Contains Roles and RoleBindings for the required set of permissions.
For example, if your goal is to allow YugabyteDB Anywhere to manage YugabyteDB universes in the namespaces yb-db-demo and yb-db-us-east4-a (the target namespaces), then you need to apply in both the target namespaces, as follows:
curl -s https://raw.githubusercontent.com/yugabyte/charts/master/rbac/platform-namespaced.yaml \
  | sed "s/namespace: <SA_NAMESPACE>/namespace: <namespace>"/g \
  | kubectl apply -n <namespace> -f -
The following command can be used to validate the service account:
kubectl auth can-i \
--as system:serviceaccount:<namespace>:yugabyte-platform-universe-management \
--namespace {namespace} \
{get|delete|list} \
{namespaces|poddisruptionbudgets|services|statefulsets|secrets|pods|pvc}
kubeconfig file
You can create a kubeconfig file for the previously created yugabyte-platform-universe-management service account as follows:
-
Run the following
wgetcommand to get the Python script for generating thekubeconfigfile:wget https://raw.githubusercontent.com/YugaByte/charts/master/stable/yugabyte/generate_kubeconfig.py -
Run the following command to generate the
kubeconfigfile:python generate_kubeconfig.py -s yugabyte-platform-universe-management -n <namespace>
Expect the following output:Generated the kubeconfig file: /tmp/yugabyte-platform-universe-management.conf -
Use this generated
kubeconfigfile as thekubeconfigin the YugabyteDB Anywhere Kubernetes provider configuration.
Select the Kubernetes service
In the YugabyteDB Anywhere UI, navigate to Configs > Cloud Provider Configuration > Managed Kubernetes Service and select one of the Kubernetes service providers using the Type field, as per the following illustration:

Configure the cloud provider
Continue configuring your Kubernetes provider as follows:
- Specify a meaningful name for your configuration.
- Choose one of the following ways to specify Kube Config for an availability zone:
- Specify at provider level in the provider form. If specified, this configuration file is used for all availability zones in all regions.
- Specify at zone level in the region form. This is required for multi-az or multi-region deployments.
- In the Service Account field, provide the name of the service account which has necessary access to manage the cluster (see Create cluster).
- In the Image Registry field, specify from where to pull the YugabyteDB image. Accept the default setting, unless you are hosting the registry.
- Use Pull Secret File to upload the pull secret to download the image of the Enterprise YugabyteDB that is in a private repository. Your Yugabyte sales representative should have provided this secret.
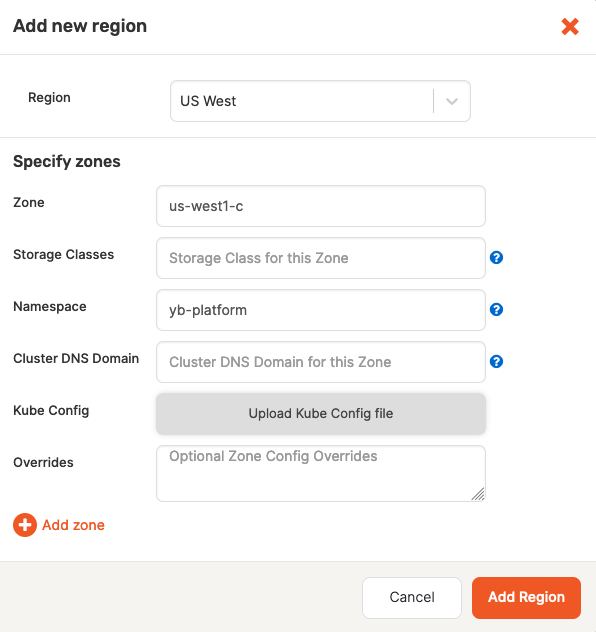
Configure region and zones
Continue configuring your Kubernetes provider by clicking Add region and completing the Add new region dialog, as follows:
-
Use the Region field to select the region.
-
Use the Zone field to select a zone label that should match with your failure domain zone label
failure-domain.beta.kubernetes.io/zone. -
Optionally, use the Storage Class field to enter a comma-delimited value. If you do not specify this value, it would default to standard. You need to ensure that this storage class exists in your Kubernetes cluster.
-
Use the Namespace field to specify the namespace. If provided service account has the
Cluster Adminpermissions, you are not required to complete this field. The service account used in the providedkubeconfigfile should have access to this namespace. -
Use Kube Config to upload the configuration file. If this file is available at provider level, you are not required to supply it.
-
Complete the Overrides field using one of the provided options. If you do not specify anything, YugabyteDB Anywhere would use defaults specified inside the Helm chart. The following overrides are available:
-
Overrides to add service-level annotations:
serviceEndpoints: - name: "yb-master-service" type: "LoadBalancer" annotations: service.beta.kubernetes.io/aws-load-balancer-internal: "0.0.0.0/0" app: "yb-master" ports: ui: "7000" - name: "yb-tserver-service" type: "LoadBalancer" annotations: service.beta.kubernetes.io/aws-load-balancer-internal: "0.0.0.0/0" app: "yb-tserver" ports: ycql-port: "9042" yedis-port: "6379" ysql-port: "5433" -
Overrides to disable LoadBalancer:
enableLoadBalancer: False -
Overrides to change the cluster domain name:
domainName: my.cluster -
Overrides to add annotations at StatefulSet-level:
networkAnnotation: annotation1: 'foo' annotation2: 'bar' -
Overrides to add custom resource allocation for YB master and TServer pods and it overrides the instance types selected in the Yugabyte universe creation flow:
resource: master: requests: cpu: 2 memory: 2Gi limits: cpu: 2 memory: 2Gi tserver: requests: cpu: 2 memory: 4Gi limits: cpu: 2 memory: 4Gi -
Overrides to enable Istio compatibility (required when Istio is used with Kubernetes):
istioCompatibility: enabled: true -
Overrides to publish Node-IP as the server broadcast address.
By default, Master and T-Server pod fully-qualified domain names (FQDNs) are used within the cluster as the server broadcast address. To publish the IPs of the nodes on which YugabyteDB TServer pods are deployed, add the following YAML to each zone override configuration:
tserver: extraEnv: - name: NODE_IP valueFrom: fieldRef: fieldPath: status.hostIP serverBroadcastAddress: "$(NODE_IP)" affinity: podAntiAffinity: requiredDuringSchedulingIgnoredDuringExecution: - labelSelector: matchExpressions: - key: app operator: In values: - "yb-tserver" topologyKey: kubernetes.io/hostname # Required to esure that the Kubernetes FQDNs are used for # internal communication between the nodes and node-to-node # TLS certificates are validated correctly. gflags: master: use_private_ip: cloud tserver: use_private_ip: cloud serviceEndpoints: - name: "yb-master-ui" type: LoadBalancer app: "yb-master" ports: http-ui: "7000" - name: "yb-tserver-service" type: NodePort externalTrafficPolicy: "Local" app: "yb-tserver" ports: tcp-yql-port: "9042" tcp-yedis-port: "6379" tcp-ysql-port: "5433" -
Overrides to run YugabyteDB as a non-root user:
podSecurityContext:
  enabled: true
  ## Set to false to stop the non-root user validation
  runAsNonRoot: true
  fsGroup: 10001
  runAsUser: 10001
  runAsGroup: 10001
Note that you cannot change users during the Helm upgrades.
-
Continue configuring your Kubernetes provider by clicking Add Zone, as per the following illustration:
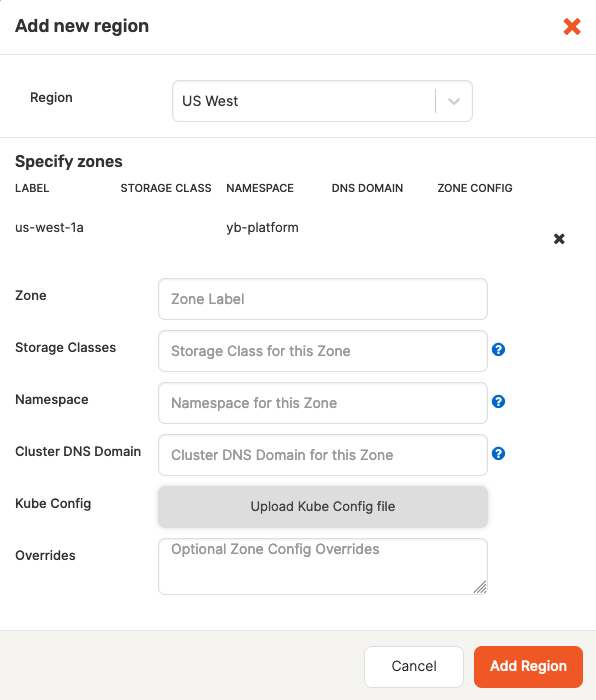
Notice that there are might be multiple zones.
Finally, click Add Region, and then click Save to save the configuration. If successful, you will be redirected to the table view of all configurations.