Quick start
Test YugabyteDB's APIs and core features by creating a local cluster on a single host.
The local cluster setup on a single host is intended for development and learning. For production deployment, performance benchmarking, or deploying a true multi-node on multi-host setup, see Deploy YugabyteDB.
Install YugabyteDB
Prerequisites
-
One of the following operating systems:
-
CentOS 7 or later
-
Ubuntu 16.04 or later
-
-
Verify that you have Python 2 or 3 installed.
$ python --versionPython 3.7.3Note
By default, CentOS 8 doesn't have an unversioned system-wide
pythoncommand. To fix this, setpython3as the alternative forpythonby running:sudo alternatives --set python /usr/bin/python3.Starting from Ubuntu 20.04,
pythonisn't available anymore. Installsudo apt install python-is-python3. -
wgetorcurlis available.The instructions use the
wgetcommand to download files. If you prefer to usecurl, you can replacewgetwithcurl -O.To install
wget:- CentOS:
yum install wget - Ubuntu:
apt install wget
To install
curl:- CentOS:
yum install curl - Ubuntu:
apt install curl
- CentOS:
-
Each tablet maps to its own file, so if you experiment with a few hundred tables and a few tablets per table, you can soon end up creating a large number of files in the current shell. Make sure to configure ulimit values.
Download YugabyteDB
-
Download the YugabyteDB package using the following
wgetcommand.$ wget https://downloads.yugabyte.com/releases/2.15.0.0/yugabyte-2.15.0.0-b11-linux-x86_64.tar.gz
OR:$ wget https://downloads.yugabyte.com/releases/2.15.0.0/yugabyte-2.15.0.0-b11-el8-aarch64.tar.gz -
Extract the package and then change directories to the YugabyteDB home.
$ tar xvfz yugabyte-2.15.0.0-b11-linux-x86_64.tar.gz && cd yugabyte-2.15.0.0/
OR:$ tar xvfz yugabyte-2.15.0.0-b11-el8-aarch64.tar.gz && cd yugabyte-2.15.0.0/
Configure YugabyteDB
To configure YugabyteDB, run the following shell script.
$ ./bin/post_install.sh
Create a local cluster
To create a single-node local cluster with a replication factor (RF) of 1, run the following command.
$ ./bin/yugabyted start
After the cluster is created, clients can connect to the YSQL and YCQL APIs at localhost:5433 and localhost:9042 respectively. You can also check ~/var/data to see the data directory and ~/var/logs to see the logs directory.
Tip
If you have previously installed YugabyteDB (2.8 or later) and created a cluster on the same computer, you may need to upgrade the YSQL system catalog to run the latest features.Check cluster status
$ ./bin/yugabyted status
+--------------------------------------------------------------------------------------------------+
|                                            yugabyted                                             |
+--------------------------------------------------------------------------------------------------+
| Status              : Running. Leader Master is present                                          |
| Web console         : http://127.0.0.1:7000                                                      |
| JDBC                : jdbc:postgresql://127.0.0.1:5433/yugabyte?user=yugabyte&password=yugabyte  |
| YSQL                : bin/ysqlsh   -U yugabyte -d yugabyte                                       |
| YCQL                : bin/ycqlsh   -u cassandra                                                  |
| Data Dir            : /home/myuser/var/data                                                      |
| Log Dir             : /home/myuser/var/logs                                                      |
| Universe UUID       : fad6c687-e1dc-4dfd-af4b-380021e19be3                                       |
+--------------------------------------------------------------------------------------------------+
Check cluster status with Admin UI
Under the hood, the cluster you have just created consists of two processes: YB-Master which keeps track of various metadata (list of tables, users, roles, permissions, and so on), and YB-TServer which is responsible for the actual end user requests for data updates and queries.
Each of the processes exposes its own Admin UI that can be used to check the status of the corresponding process, and perform certain administrative operations. The YB-Master Admin UI is available at http://127.0.0.1:7000 and the YB-TServer Admin UI is available at http://127.0.0.1:9000.
Overview and YB-Master status
The YB-Master home page shows that you have a cluster (or universe) with a replication factor of 1, a single node, and no tables. The YugabyteDB version is also displayed.
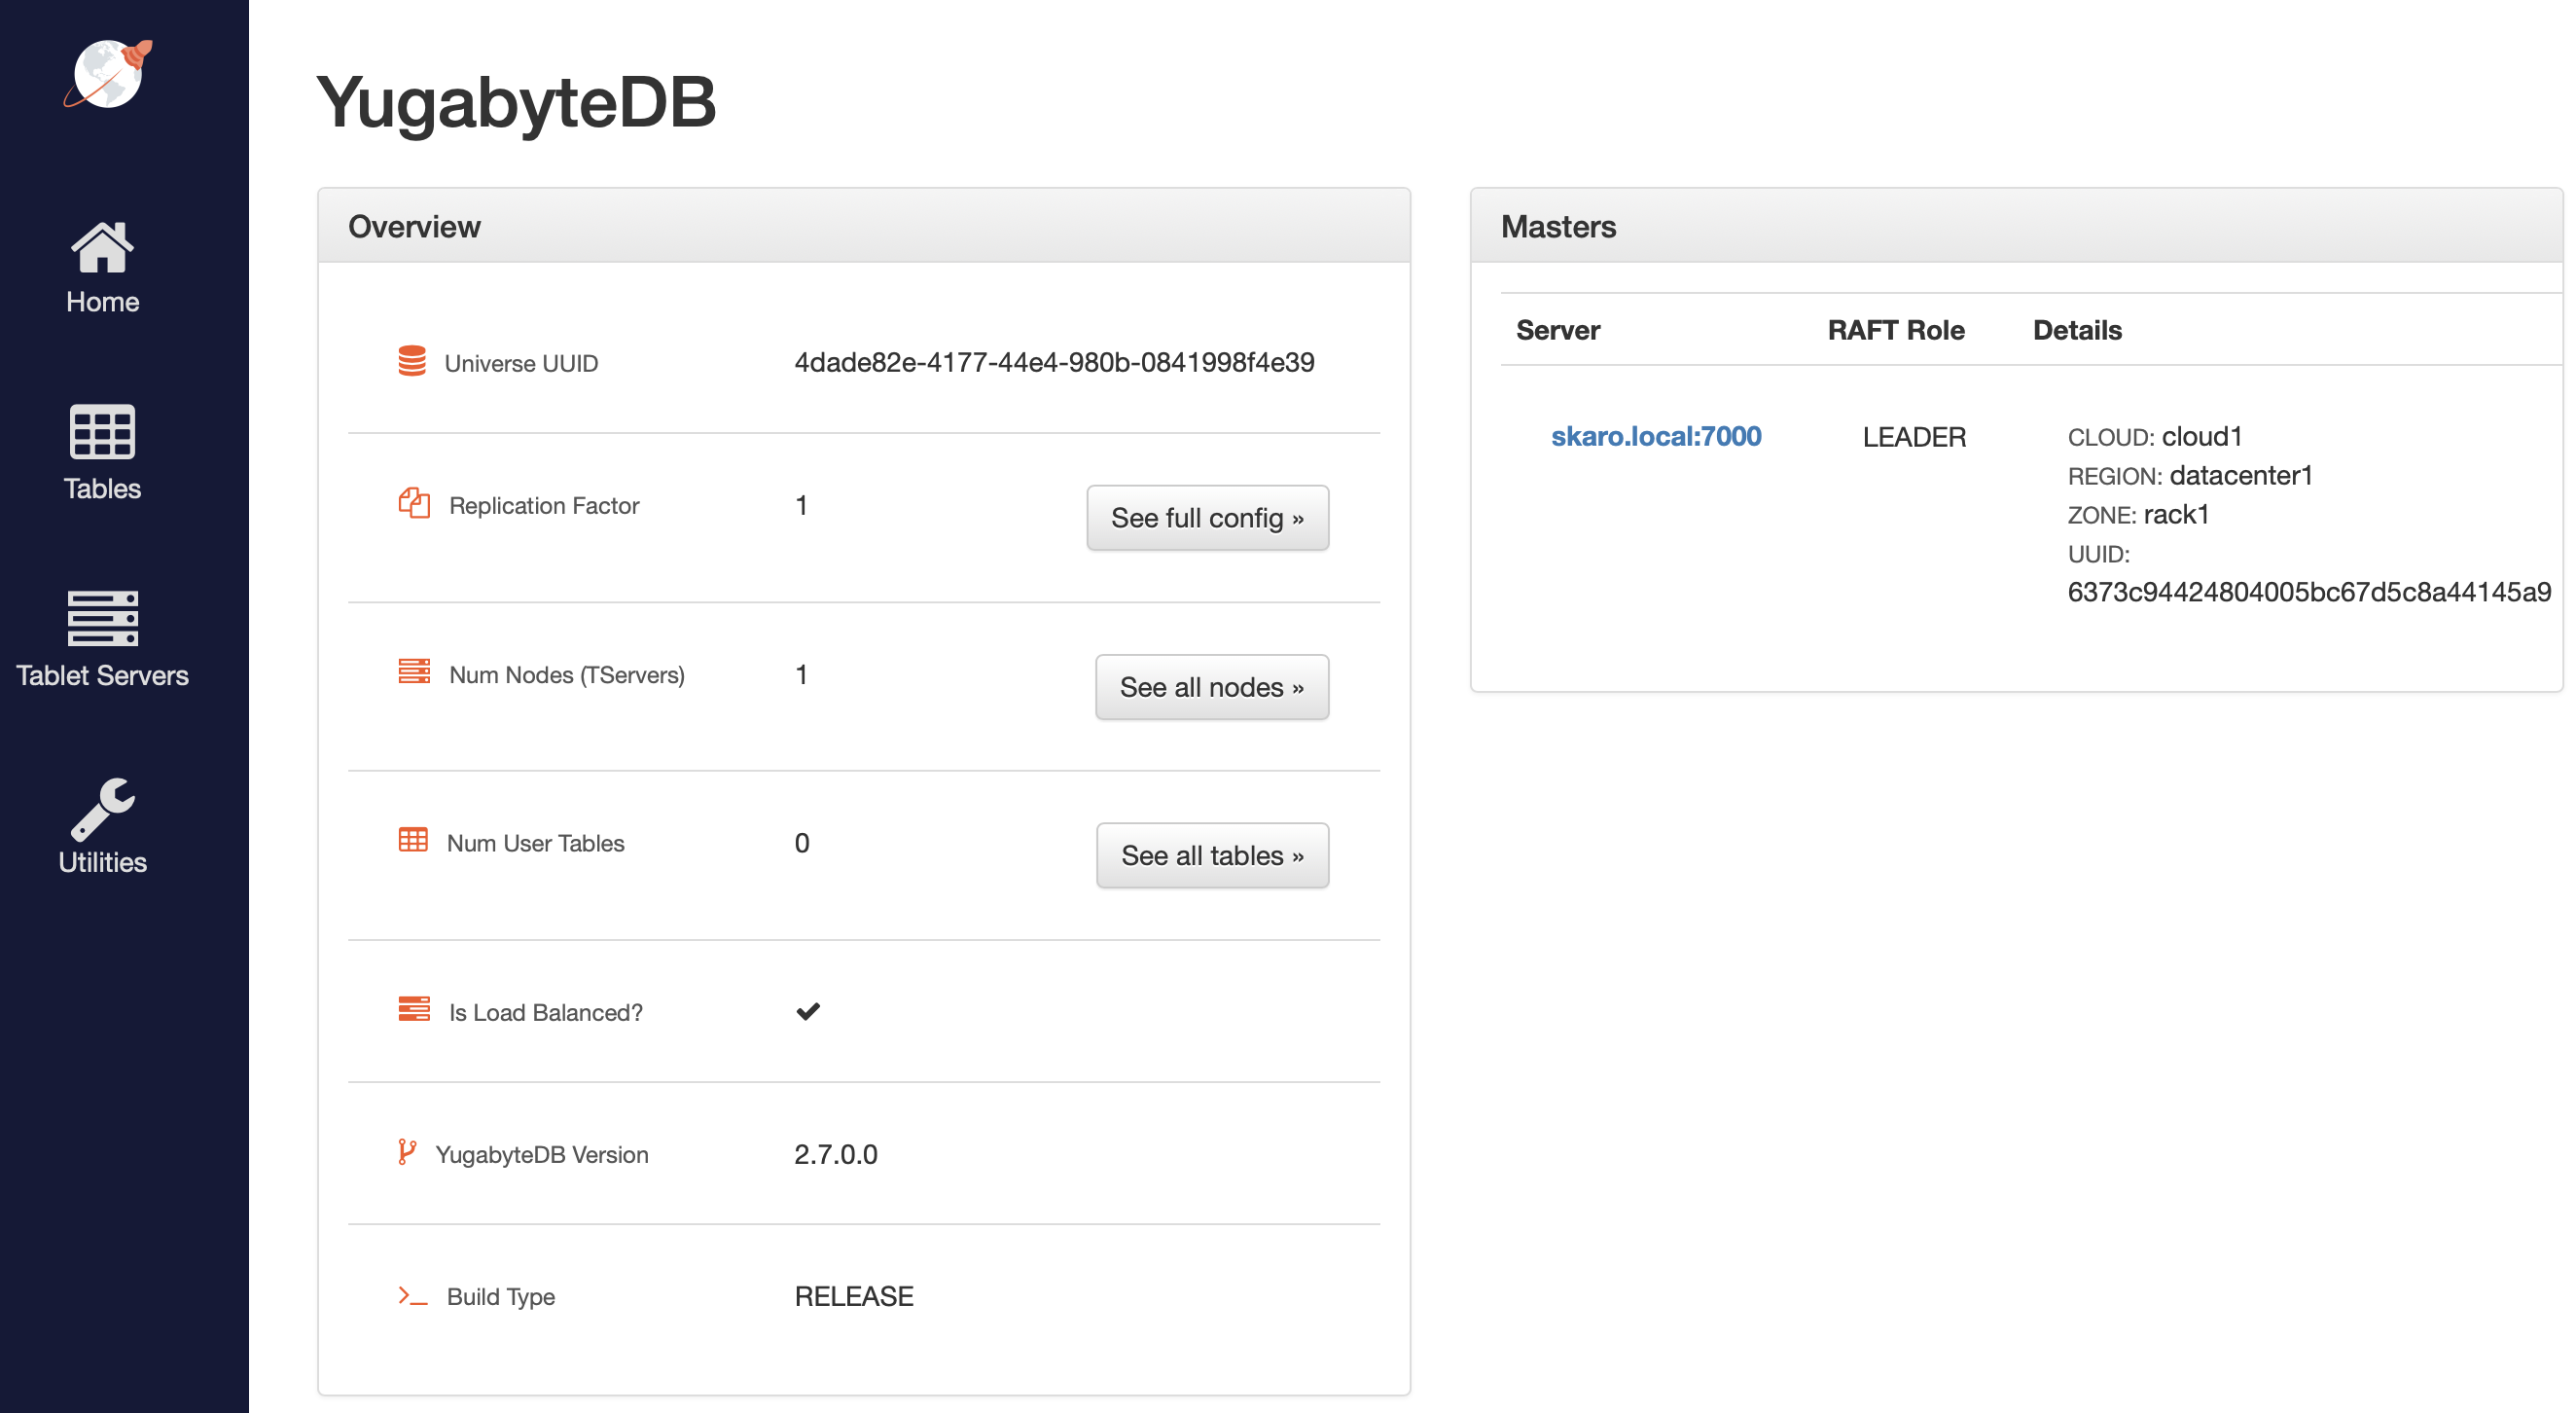
The Masters section highlights the 1 YB-Master along with its corresponding cloud, region, and zone placement.
YB-TServer status
Click See all nodes to go to the Tablet Servers page, which lists the YB-TServer along with the time since it last connected to the YB-Master using regular heartbeats. Because there are no user tables, User Tablet-Peers / Leaders is 0. As tables are added, new tablets (aka shards) will be created automatically and distributed evenly across all the available tablet servers.

Build a Java application
Prerequisites
This tutorial assumes that:
-
YugabyteDB is up and running. Using the yb-ctl utility, create a universe with a 3-node RF-3 cluster with some fictitious geo-locations assigned.
$ cd <path-to-yugabytedb-installation> ./bin/yb-ctl create --rf 3 --placement_info "aws.us-west.us-west-2a,aws.us-west.us-west-2a,aws.us-west.us-west-2b" -
Java Development Kit (JDK) 1.8, or later, is installed. JDK installers can be downloaded from OpenJDK.
-
Apache Maven 3.3 or later, is installed.
Create and configure the Java project
-
Create a project called "DriverDemo".
$ mvn archetype:generate \ -DgroupId=com.yugabyte \ -DartifactId=DriverDemo \ -DarchetypeArtifactId=maven-archetype-quickstart \ -DinteractiveMode=false $ cd DriverDemo -
Open the pom.xml file in a text editor and add the following below the
<url>element.<properties> <maven.compiler.source>1.8</maven.compiler.source> <maven.compiler.target>1.8</maven.compiler.target> </properties> -
Add the following dependencies for the driver HikariPool within the
<dependencies>element inpom.xml.<dependency> <groupId>com.yugabyte</groupId> <artifactId>jdbc-yugabytedb</artifactId> <version>42.3.0</version> </dependency> <!-- https://mvnrepository.com/artifact/com.zaxxer/HikariCP --> <dependency> <groupId>com.zaxxer</groupId> <artifactId>HikariCP</artifactId> <version>5.0.0</version> </dependency> -
Save and close
pom.xml. -
Install the added dependency.
$ mvn install
Create the sample Java application
You'll create two java applications, UniformLoadBalance and TopologyAwareLoadBalance. In each, you can create connections in two ways: using the DriverManager.getConnection() API, or using YBClusterAwareDataSource and HikariPool. This example shows both approaches.
Uniform load balancing
-
Create a file called
./src/main/java/com/yugabyte/UniformLoadBalanceApp.java.$ touch ./src/main/java/com/yugabyte/UniformLoadBalanceApp.java -
Paste the following into
UniformLoadBalanceApp.java:package com.yugabyte; import com.zaxxer.hikari.HikariConfig; import com.zaxxer.hikari.HikariDataSource; import java.sql.Connection; import java.sql.DriverManager; import java.sql.SQLException; import java.util.ArrayList; import java.util.List; import java.util.Properties; import java.util.Scanner; public class UniformLoadBalanceApp { public static void main(String[] args) { makeConnectionUsingDriverManager(); makeConnectionUsingYbClusterAwareDataSource(); System.out.println("Execution of Uniform Load Balance Java App complete!!"); } public static void makeConnectionUsingDriverManager() { //List to store the connections so that they can be closed at the end List<Connection> connectionList = new ArrayList<>(); System.out.println("Lets create 6 connections using DriverManager"); String yburl = "jdbc:yugabytedb://127.0.0.1:5433/yugabyte?user=yugabyte&password=yugabyte&load-balance=true"; try { for(int i=0; i<6; i++) { Connection connection = DriverManager.getConnection(yburl); connectionList.add(connection); } System.out.println("You can verify the load balancing by visiting http://<host>:13000/rpcz as discussed before"); System.out.println("Enter a integer to continue once verified:"); int x = new Scanner(System.in).nextInt(); System.out.println("Closing the connections!!"); for(Connection connection : connectionList) { connection.close(); } } catch (SQLException exception) { exception.printStackTrace(); } } public static void makeConnectionUsingYbClusterAwareDataSource() { System.out.println("Now, Lets create 10 connections using YbClusterAwareDataSource and Hikari Pool"); Properties poolProperties = new Properties(); poolProperties.setProperty("dataSourceClassName", "com.yugabyte.ysql.YBClusterAwareDataSource"); //the pool will create 10 connections to the servers poolProperties.setProperty("maximumPoolSize", String.valueOf(10)); poolProperties.setProperty("dataSource.serverName", "127.0.0.1"); poolProperties.setProperty("dataSource.portNumber", "5433"); poolProperties.setProperty("dataSource.databaseName", "yugabyte"); poolProperties.setProperty("dataSource.user", "yugabyte"); poolProperties.setProperty("dataSource.password", "yugabyte"); // If you want to provide additional end points String additionalEndpoints = "127.0.0.2:5433,127.0.0.3:5433"; poolProperties.setProperty("dataSource.additionalEndpoints", additionalEndpoints); HikariConfig config = new HikariConfig(poolProperties); config.validate(); HikariDataSource hikariDataSource = new HikariDataSource(config); System.out.println("Wait for some time for Hikari Pool to setup and create the connections..."); System.out.println("You can verify the load balancing by visiting http://<host>:13000/rpcz as discussed before."); System.out.println("Enter a integer to continue once verified:"); int x = new Scanner(System.in).nextInt(); System.out.println("Closing the Hikari Connection Pool!!"); hikariDataSource.close(); } }Note
When usingDriverManager.getConnection(), you need to include theload-balance=trueproperty in the connection URL. In the case ofYBClusterAwareDataSource, load balancing is enabled by default. -
Run the application.
mvn -q package exec:java -DskipTests -Dexec.mainClass=com.yugabyte.UniformLoadBalanceApp
Topology-aware load balancing
-
Create a file called
./src/main/java/com/yugabyte/TopologyAwareLoadBalanceApp.java.$ touch ./src/main/java/com/yugabyte/TopologyAwareLoadBalanceApp.java -
Paste the following into
TopologyAwareLoadBalanceApp.java:package com.yugabyte; import com.zaxxer.hikari.HikariConfig; import com.zaxxer.hikari.HikariDataSource; import java.sql.Connection; import java.sql.DriverManager; import java.sql.SQLException; import java.util.ArrayList; import java.util.List; import java.util.Properties; import java.util.Scanner; public class TopologyAwareLoadBalanceApp { public static void main(String[] args) { makeConnectionUsingDriverManager(); makeConnectionUsingYbClusterAwareDataSource(); System.out.println("Execution of Uniform Load Balance Java App complete!!"); } public static void makeConnectionUsingDriverManager() { //List to store the connections so that they can be closed at the end List<Connection> connectionList = new ArrayList<>(); System.out.println("Lets create 6 connections using DriverManager"); String yburl = "jdbc:yugabytedb://127.0.0.1:5433/yugabyte?user=yugabyte&password=yugabyte&load-balance=true" + "&topology-keys=aws.us-west.us-west-2a"; try { for(int i=0; i<6; i++) { Connection connection = DriverManager.getConnection(yburl); connectionList.add(connection); } System.out.println("You can verify the load balancing by visiting http://<host>:13000/rpcz as discussed before"); System.out.println("Enter a integer to continue once verified:"); int x = new Scanner(System.in).nextInt(); System.out.println("Closing the connections!!"); for(Connection connection : connectionList) { connection.close(); } } catch (SQLException exception) { exception.printStackTrace(); } } public static void makeConnectionUsingYbClusterAwareDataSource() { System.out.println("Now, Lets create 10 connections using YbClusterAwareDataSource and Hikari Pool"); Properties poolProperties = new Properties(); poolProperties.setProperty("dataSourceClassName", "com.yugabyte.ysql.YBClusterAwareDataSource"); //the pool will create 10 connections to the servers poolProperties.setProperty("maximumPoolSize", String.valueOf(10)); poolProperties.setProperty("dataSource.serverName", "127.0.0.1"); poolProperties.setProperty("dataSource.portNumber", "5433"); poolProperties.setProperty("dataSource.databaseName", "yugabyte"); poolProperties.setProperty("dataSource.user", "yugabyte"); poolProperties.setProperty("dataSource.password", "yugabyte"); // If you want to provide additional end points String additionalEndpoints = "127.0.0.2:5433,127.0.0.3:5433"; poolProperties.setProperty("dataSource.additionalEndpoints", additionalEndpoints); // If you want to load balance between specific geo locations using topology keys String geoLocations = "aws.us-west.us-west-2a"; poolProperties.setProperty("dataSource.topologyKeys", geoLocations); HikariConfig config = new HikariConfig(poolProperties); config.validate(); HikariDataSource hikariDataSource = new HikariDataSource(config); System.out.println("Wait for some time for Hikari Pool to setup and create the connections..."); System.out.println("You can verify the load balancing by visiting http://<host>:13000/rpcz as discussed before."); System.out.println("Enter a integer to continue once verified:"); int x = new Scanner(System.in).nextInt(); System.out.println("Closing the Hikari Connection Pool!!"); hikariDataSource.close(); } }Note
When usingDriverManager.getConnection(), you need to include theload-balance=trueproperty in the connection URL. In the case ofYBClusterAwareDataSource, load balancing is enabled by default, but you must set propertydataSource.topologyKeys. -
Run the application.
mvn -q package exec:java -DskipTests -Dexec.mainClass=com.yugabyte.TopologyAwareLoadBalanceApp