Quick start
Test YugabyteDB's APIs and core features by creating a local cluster on a single host.
The local cluster setup on a single host is intended for development and learning. For production deployment, performance benchmarking, or deploying a true multi-node on multi-host setup, see Deploy YugabyteDB.
Install YugabyteDB
Prerequisites
-
Minikube is installed on your localhost machine.
The Kubernetes version used by Minikube should be v1.18.0 or later. The default Kubernetes version being used by Minikube displays when you run the
minikube startcommand. To install Minikube, see Install Minikube in the Kubernetes documentation. -
kubectl is installed.
To install
kubectl, see Install kubectl in the Kubernetes documentation. -
Helm 3.4 or later is installed.
To install
helm, see Install helm in the Helm documentation.
Start Kubernetes
-
Start Kubernetes using Minikube by running the following command. Note that minikube by default brings up a single-node Kubernetes environment with 2GB RAM, 2 CPUS, and a disk of 20GB. We recommend starting minkube with at least 8GB RAM, 4 CPUs and 40GB disk as shown below.
$ minikube start --memory=8192 --cpus=4 --disk-size=40g --vm-driver=virtualbox... Configuring environment for Kubernetes v1.14.2 on Docker 18.09.6 ... -
Review Kubernetes dashboard by running the following command.
$ minikube dashboard -
Confirm that your kubectl is configured correctly by running the following command.
$ kubectl versionClient Version: version.Info{Major:"1", Minor:"14+", GitVersion:"v1.14.10-dispatcher", ...} Server Version: version.Info{Major:"1", Minor:"14", GitVersion:"v1.14.2", ...} -
Confirm that your Helm is configured correctly by running the following command.
$ helm versionversion.BuildInfo{Version:"v3.0.3", GitCommit:"...", GitTreeState:"clean", GoVersion:"go1.13.6"}
Download YugabyteDB Helm Chart
Add charts repository
To add the YugabyteDB charts repository, run the following command.
$ helm repo add yugabytedb https://charts.yugabyte.com
Fetch updates from the repository
Make sure that you have the latest updates to the repository by running the following command.
$ helm repo update
Validate the chart version
$ helm search repo yugabytedb/yugabyte --version 2.15.0
NAME                 CHART VERSION  APP VERSION   DESCRIPTION
yugabytedb/yugabyte  2.15.0          2.15.0.0-b11  YugabyteDB is the high-performance distributed ...
Now you are ready to create a local YugabyteDB cluster.
Create a local cluster
Create a YugabyteDB cluster in Minikube using the commands below. Note that for Helm, you have to first create a namespace.
$ kubectl create namespace yb-demo
$ helm install yb-demo yugabytedb/yugabyte \
--version 2.15.0 \
--set resource.master.requests.cpu=0.5,resource.master.requests.memory=0.5Gi,\
resource.tserver.requests.cpu=0.5,resource.tserver.requests.memory=0.5Gi,\
replicas.master=1,replicas.tserver=1 --namespace yb-demo
Note that in Minikube, the LoadBalancers for yb-master-ui and yb-tserver-service will remain in pending state since load balancers are not available in a Minikube environment. If you would like to turn off these services then pass the enableLoadBalancer=False flag as shown below.
$ helm install yb-demo yugabytedb/yugabyte \
--version 2.15.0 \
--set resource.master.requests.cpu=0.5,resource.master.requests.memory=0.5Gi,\
resource.tserver.requests.cpu=0.5,resource.tserver.requests.memory=0.5Gi,\
replicas.master=1,replicas.tserver=1,enableLoadBalancer=False --namespace yb-demo
Check cluster status with kubectl
Run the following command to see that you now have two services with one pod each — 1 yb-master pod (yb-master-0) and 1 yb-tserver pod (yb-tserver-0) running. For details on the roles of these pods in a YugabyteDB cluster (aka Universe), see Universe in the Concepts section.
$ kubectl --namespace yb-demo get pods
NAME           READY     STATUS              RESTARTS   AGE
yb-master-0    0/2       ContainerCreating   0          5s
yb-tserver-0   0/2       ContainerCreating   0          4s
Eventually, all the pods will have the Running state.
NAME           READY     STATUS    RESTARTS   AGE
yb-master-0    2/2       Running   0          13s
yb-tserver-0   2/2       Running   0          12s
To see the status of the three services, run the following command.
$ kubectl --namespace yb-demo get services
NAME                 TYPE           CLUSTER-IP     EXTERNAL-IP   PORT(S)                                        AGE
yb-master-ui         LoadBalancer   10.98.66.255   <pending>     7000:31825/TCP                                 119s
yb-masters           ClusterIP      None           <none>        7100/TCP,7000/TCP                              119s
yb-tserver-service   LoadBalancer   10.106.5.69    <pending>     6379:31320/TCP,9042:30391/TCP,5433:30537/TCP   119s
yb-tservers          ClusterIP      None           <none>        7100/TCP,9000/TCP,6379/TCP,9042/TCP,5433/TCP   119s
Check cluster status with Admin UI
Under the hood, the cluster you have just created consists of two processes: YB-Master which keeps track of various metadata (list of tables, users, roles, permissions, and so on), and YB-TServer which is responsible for the actual end user requests for data updates and queries.
Each of the processes exposes its own Admin UI that can be used to check the status of the corresponding process, and perform certain administrative operations.
To get access to the Admin UI, you first need to set up port forwarding for port 7000:
$ kubectl --namespace yb-demo port-forward svc/yb-master-ui 7000:7000
Now, you can view the yb-master-0 Admin UI at http://localhost:7000.
Overview and YB-Master status
The YB-Master home page shows that you have a cluster (or universe) with a replication factor of 1, a single node, and no tables. The YugabyteDB version is also displayed.
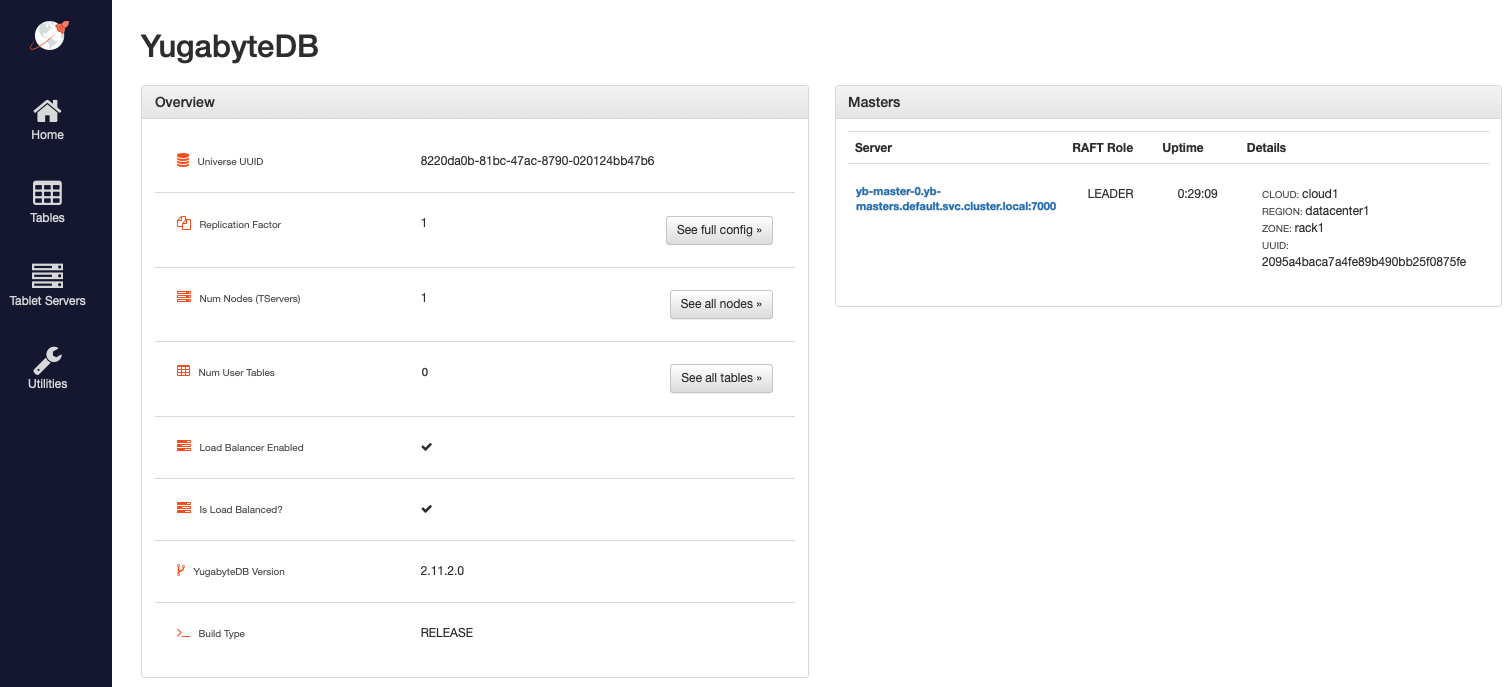
The Masters section highlights the 1 YB-Master along with its corresponding cloud, region, and zone placement.
YB-TServer status
Click See all nodes to go to the Tablet Servers page, which lists the YB-TServer along with the time since it last connected to the YB-Master using regular heartbeats.

Build a Java application
Prerequisites
This tutorial assumes that:
-
YugabyteDB is up and running. Using the yb-ctl utility, create a universe with a 3-node RF-3 cluster with some fictitious geo-locations assigned.
$ cd <path-to-yugabytedb-installation> ./bin/yb-ctl create --rf 3 --placement_info "aws.us-west.us-west-2a,aws.us-west.us-west-2a,aws.us-west.us-west-2b" -
Java Development Kit (JDK) 1.8, or later, is installed. JDK installers can be downloaded from OpenJDK.
-
Apache Maven 3.3 or later, is installed.
Create and configure the Java project
-
Create a project called "DriverDemo".
$ mvn archetype:generate \ -DgroupId=com.yugabyte \ -DartifactId=DriverDemo \ -DarchetypeArtifactId=maven-archetype-quickstart \ -DinteractiveMode=false $ cd DriverDemo -
Open the pom.xml file in a text editor and add the following below the
<url>element.<properties> <maven.compiler.source>1.8</maven.compiler.source> <maven.compiler.target>1.8</maven.compiler.target> </properties> -
Add the following dependencies for the driver HikariPool within the
<dependencies>element inpom.xml.<dependency> <groupId>com.yugabyte</groupId> <artifactId>jdbc-yugabytedb</artifactId> <version>42.3.0</version> </dependency> <!-- https://mvnrepository.com/artifact/com.zaxxer/HikariCP --> <dependency> <groupId>com.zaxxer</groupId> <artifactId>HikariCP</artifactId> <version>5.0.0</version> </dependency> -
Save and close
pom.xml. -
Install the added dependency.
$ mvn install
Create the sample Java application
You'll create two java applications, UniformLoadBalance and TopologyAwareLoadBalance. In each, you can create connections in two ways: using the DriverManager.getConnection() API, or using YBClusterAwareDataSource and HikariPool. This example shows both approaches.
Uniform load balancing
-
Create a file called
./src/main/java/com/yugabyte/UniformLoadBalanceApp.java.$ touch ./src/main/java/com/yugabyte/UniformLoadBalanceApp.java -
Paste the following into
UniformLoadBalanceApp.java:package com.yugabyte; import com.zaxxer.hikari.HikariConfig; import com.zaxxer.hikari.HikariDataSource; import java.sql.Connection; import java.sql.DriverManager; import java.sql.SQLException; import java.util.ArrayList; import java.util.List; import java.util.Properties; import java.util.Scanner; public class UniformLoadBalanceApp { public static void main(String[] args) { makeConnectionUsingDriverManager(); makeConnectionUsingYbClusterAwareDataSource(); System.out.println("Execution of Uniform Load Balance Java App complete!!"); } public static void makeConnectionUsingDriverManager() { //List to store the connections so that they can be closed at the end List<Connection> connectionList = new ArrayList<>(); System.out.println("Lets create 6 connections using DriverManager"); String yburl = "jdbc:yugabytedb://127.0.0.1:5433/yugabyte?user=yugabyte&password=yugabyte&load-balance=true"; try { for(int i=0; i<6; i++) { Connection connection = DriverManager.getConnection(yburl); connectionList.add(connection); } System.out.println("You can verify the load balancing by visiting http://<host>:13000/rpcz as discussed before"); System.out.println("Enter a integer to continue once verified:"); int x = new Scanner(System.in).nextInt(); System.out.println("Closing the connections!!"); for(Connection connection : connectionList) { connection.close(); } } catch (SQLException exception) { exception.printStackTrace(); } } public static void makeConnectionUsingYbClusterAwareDataSource() { System.out.println("Now, Lets create 10 connections using YbClusterAwareDataSource and Hikari Pool"); Properties poolProperties = new Properties(); poolProperties.setProperty("dataSourceClassName", "com.yugabyte.ysql.YBClusterAwareDataSource"); //the pool will create 10 connections to the servers poolProperties.setProperty("maximumPoolSize", String.valueOf(10)); poolProperties.setProperty("dataSource.serverName", "127.0.0.1"); poolProperties.setProperty("dataSource.portNumber", "5433"); poolProperties.setProperty("dataSource.databaseName", "yugabyte"); poolProperties.setProperty("dataSource.user", "yugabyte"); poolProperties.setProperty("dataSource.password", "yugabyte"); // If you want to provide additional end points String additionalEndpoints = "127.0.0.2:5433,127.0.0.3:5433"; poolProperties.setProperty("dataSource.additionalEndpoints", additionalEndpoints); HikariConfig config = new HikariConfig(poolProperties); config.validate(); HikariDataSource hikariDataSource = new HikariDataSource(config); System.out.println("Wait for some time for Hikari Pool to setup and create the connections..."); System.out.println("You can verify the load balancing by visiting http://<host>:13000/rpcz as discussed before."); System.out.println("Enter a integer to continue once verified:"); int x = new Scanner(System.in).nextInt(); System.out.println("Closing the Hikari Connection Pool!!"); hikariDataSource.close(); } }Note
When usingDriverManager.getConnection(), you need to include theload-balance=trueproperty in the connection URL. In the case ofYBClusterAwareDataSource, load balancing is enabled by default. -
Run the application.
mvn -q package exec:java -DskipTests -Dexec.mainClass=com.yugabyte.UniformLoadBalanceApp
Topology-aware load balancing
-
Create a file called
./src/main/java/com/yugabyte/TopologyAwareLoadBalanceApp.java.$ touch ./src/main/java/com/yugabyte/TopologyAwareLoadBalanceApp.java -
Paste the following into
TopologyAwareLoadBalanceApp.java:package com.yugabyte; import com.zaxxer.hikari.HikariConfig; import com.zaxxer.hikari.HikariDataSource; import java.sql.Connection; import java.sql.DriverManager; import java.sql.SQLException; import java.util.ArrayList; import java.util.List; import java.util.Properties; import java.util.Scanner; public class TopologyAwareLoadBalanceApp { public static void main(String[] args) { makeConnectionUsingDriverManager(); makeConnectionUsingYbClusterAwareDataSource(); System.out.println("Execution of Uniform Load Balance Java App complete!!"); } public static void makeConnectionUsingDriverManager() { //List to store the connections so that they can be closed at the end List<Connection> connectionList = new ArrayList<>(); System.out.println("Lets create 6 connections using DriverManager"); String yburl = "jdbc:yugabytedb://127.0.0.1:5433/yugabyte?user=yugabyte&password=yugabyte&load-balance=true" + "&topology-keys=aws.us-west.us-west-2a"; try { for(int i=0; i<6; i++) { Connection connection = DriverManager.getConnection(yburl); connectionList.add(connection); } System.out.println("You can verify the load balancing by visiting http://<host>:13000/rpcz as discussed before"); System.out.println("Enter a integer to continue once verified:"); int x = new Scanner(System.in).nextInt(); System.out.println("Closing the connections!!"); for(Connection connection : connectionList) { connection.close(); } } catch (SQLException exception) { exception.printStackTrace(); } } public static void makeConnectionUsingYbClusterAwareDataSource() { System.out.println("Now, Lets create 10 connections using YbClusterAwareDataSource and Hikari Pool"); Properties poolProperties = new Properties(); poolProperties.setProperty("dataSourceClassName", "com.yugabyte.ysql.YBClusterAwareDataSource"); //the pool will create 10 connections to the servers poolProperties.setProperty("maximumPoolSize", String.valueOf(10)); poolProperties.setProperty("dataSource.serverName", "127.0.0.1"); poolProperties.setProperty("dataSource.portNumber", "5433"); poolProperties.setProperty("dataSource.databaseName", "yugabyte"); poolProperties.setProperty("dataSource.user", "yugabyte"); poolProperties.setProperty("dataSource.password", "yugabyte"); // If you want to provide additional end points String additionalEndpoints = "127.0.0.2:5433,127.0.0.3:5433"; poolProperties.setProperty("dataSource.additionalEndpoints", additionalEndpoints); // If you want to load balance between specific geo locations using topology keys String geoLocations = "aws.us-west.us-west-2a"; poolProperties.setProperty("dataSource.topologyKeys", geoLocations); HikariConfig config = new HikariConfig(poolProperties); config.validate(); HikariDataSource hikariDataSource = new HikariDataSource(config); System.out.println("Wait for some time for Hikari Pool to setup and create the connections..."); System.out.println("You can verify the load balancing by visiting http://<host>:13000/rpcz as discussed before."); System.out.println("Enter a integer to continue once verified:"); int x = new Scanner(System.in).nextInt(); System.out.println("Closing the Hikari Connection Pool!!"); hikariDataSource.close(); } }Note
When usingDriverManager.getConnection(), you need to include theload-balance=trueproperty in the connection URL. In the case ofYBClusterAwareDataSource, load balancing is enabled by default, but you must set propertydataSource.topologyKeys. -
Run the application.
mvn -q package exec:java -DskipTests -Dexec.mainClass=com.yugabyte.TopologyAwareLoadBalanceApp