Google Kubernetes Engine (GKE)
Prerequisites
- Download and install the Google Cloud SDK.
NOTE: If you install gcloud using a package manager (as opposed to downloading and installing it manually), it does not support some of the commands below.
- Install
kubectl
After installing the Google Cloud SDK, install the kubectl command line tool by running the following command:
$ gcloud components install kubectl
- Configure defaults for
gcloud
Set the project ID as yugabyte. You can change this as needed.
$ gcloud config set project yugabyte
1. Create a GKE cluster
Each cluster brings up 3 nodes each of the type n1-standard-1 for the Kubernetes masters. You can directly create a cluster with the desired machine type using the --machine-type option. In this example, you are going to create a node-pool with n1-standard-8 type nodes for the YugabyteDB universe.
- Choose the zone
First, choose the zone in which you want to run the cluster in. In this tutorial, you are going to deploy the Kubernetes masters using the default machine type n1-standard-1 in the zone us-west1-a, and add a node pool with the desired node type and node count in order to deploy the YugabyteDB universe. You can view the list of zones by running the following command:
$ gcloud compute zones list
NAME                       REGION                   STATUS
...
us-west1-b                 us-west1                 UP
us-west1-c                 us-west1                 UP
us-west1-a                 us-west1                 UP
...
- Create the GKE cluster
Create a Kubernetes cluster on GKE by running the following in order to create a cluster in the desired zone.
$ gcloud container clusters create yugabyte --zone us-west1-b
- List the cluster
You can list the available cluster by running the following command.
$ gcloud container clusters list
NAME      LOCATION    MASTER_VERSION  MASTER_IP       MACHINE_TYPE   NODE_VERSION  NUM_NODES  STATUS
yugabyte  us-west1-b  1.8.7-gke.1     35.199.164.253  n1-standard-1  1.8.7-gke.1   3          RUNNING
Created [https://container.googleapis.com/v1/projects/yugabyte/zones/us-west1-b/clusters/yugabyte].
2. Create a node pool
Create a node pool with three nodes, each having eight CPUs and two local SSDs.
$ gcloud container node-pools create node-pool-8cpu-2ssd \
      --cluster=yugabyte \
      --local-ssd-count=2 \
      --machine-type=n1-standard-8 \
      --num-nodes=3 \
      --zone=us-west1-b
Created
NAME                 MACHINE_TYPE   DISK_SIZE_GB  NODE_VERSION
node-pool-8cpu-2ssd  n1-standard-8  100           1.8.7-gke.1
Note the --local-ssd-count option above, which tells gcloud to mount the nodes with two local SSDs each.
You can list all the node pools by running the following command.
$ gcloud container node-pools list --cluster yugabyte --zone=us-west1-b
NAME                 MACHINE_TYPE   DISK_SIZE_GB  NODE_VERSION
default-pool         n1-standard-1  100           1.8.7-gke.1
node-pool-8cpu-2ssd  n1-standard-8  100           1.8.7-gke.1
You can view details of the node-pool just created by running the following command:
$ gcloud container node-pools describe node-pool-8cpu-2ssd --cluster yugabyte --zone=us-west1-b
config:
  diskSizeGb: 100
  imageType: COS
  localSsdCount: 2
  machineType: n1-standard-8
initialNodeCount: 3
name: node-pool-8cpu-2ssd
3. Create a YugabyteDB universe
If this is your only container cluster, kubectl automatically points to this cluster. However, if you have multiple clusters, you should switch kubectl to point to this cluster by running the following command:
$ gcloud container clusters get-credentials yugabyte --zone us-west1-b
Fetching cluster endpoint and auth data.
kubeconfig entry generated for yugabyte.
You can launch a universe on this node pool to run on local SSDs by running the following command.
$ kubectl apply -f https://raw.githubusercontent.com/yugabyte/yugabyte-db/master/cloud/kubernetes/yugabyte-statefulset-local-ssd-gke.yaml
service "yb-masters" created
service "yb-master-ui" created
statefulset "yb-master" created
service "yb-tservers" created
statefulset "yb-tserver" created
You can see the YAML file to launch a YugabyteDB kubernetes universe on nodes with local disks.
Note the following nodeSelector snippet in the YAML file which instructs the Kubernetes scheduler to place the YugabyteDB pods on nodes that have local disks:
  nodeSelector:
    cloud.google.com/gke-local-ssd: "true"
Also, note that you instruct the scheduler to place the various pods in the yb-master or yb-tserver services on different physical nodes with the antiAffinity hint:
  spec:
    affinity:
      # Set the anti-affinity selector scope to YB masters.
      podAntiAffinity:
        preferredDuringSchedulingIgnoredDuringExecution:
        - weight: 100
          podAffinityTerm:
            labelSelector:
              matchExpressions:
              - key: app
                operator: In
                values:
                - yb-master
            topologyKey: kubernetes.io/hostname
4. View the universe
You can verify that the YugabyteDB pods are running by running the following command:
$ kubectl get pods
NAME           READY     STATUS    RESTARTS   AGE
yb-master-0    1/1       Running   0          49s
yb-master-1    1/1       Running   0          49s
yb-master-2    1/1       Running   0          49s
yb-tserver-0   1/1       Running   0          48s
yb-tserver-1   1/1       Running   0          48s
yb-tserver-2   1/1       Running   0          48s
You can check all the services that are running by doing the following:
$ kubectl get services
NAME           TYPE           CLUSTER-IP    EXTERNAL-IP     PORT(S)                               AGE
kubernetes     ClusterIP      10.7.240.1    <none>          443/TCP                               11m
yb-master-ui   LoadBalancer   10.7.246.86   XX.XX.XX.XX     7000:30707/TCP                        1m
yb-masters     ClusterIP      None          <none>          7000/TCP,7100/TCP                     1m
yb-tservers    ClusterIP      None          <none>          9000/TCP,9100/TCP,9042/TCP,6379/TCP   1m
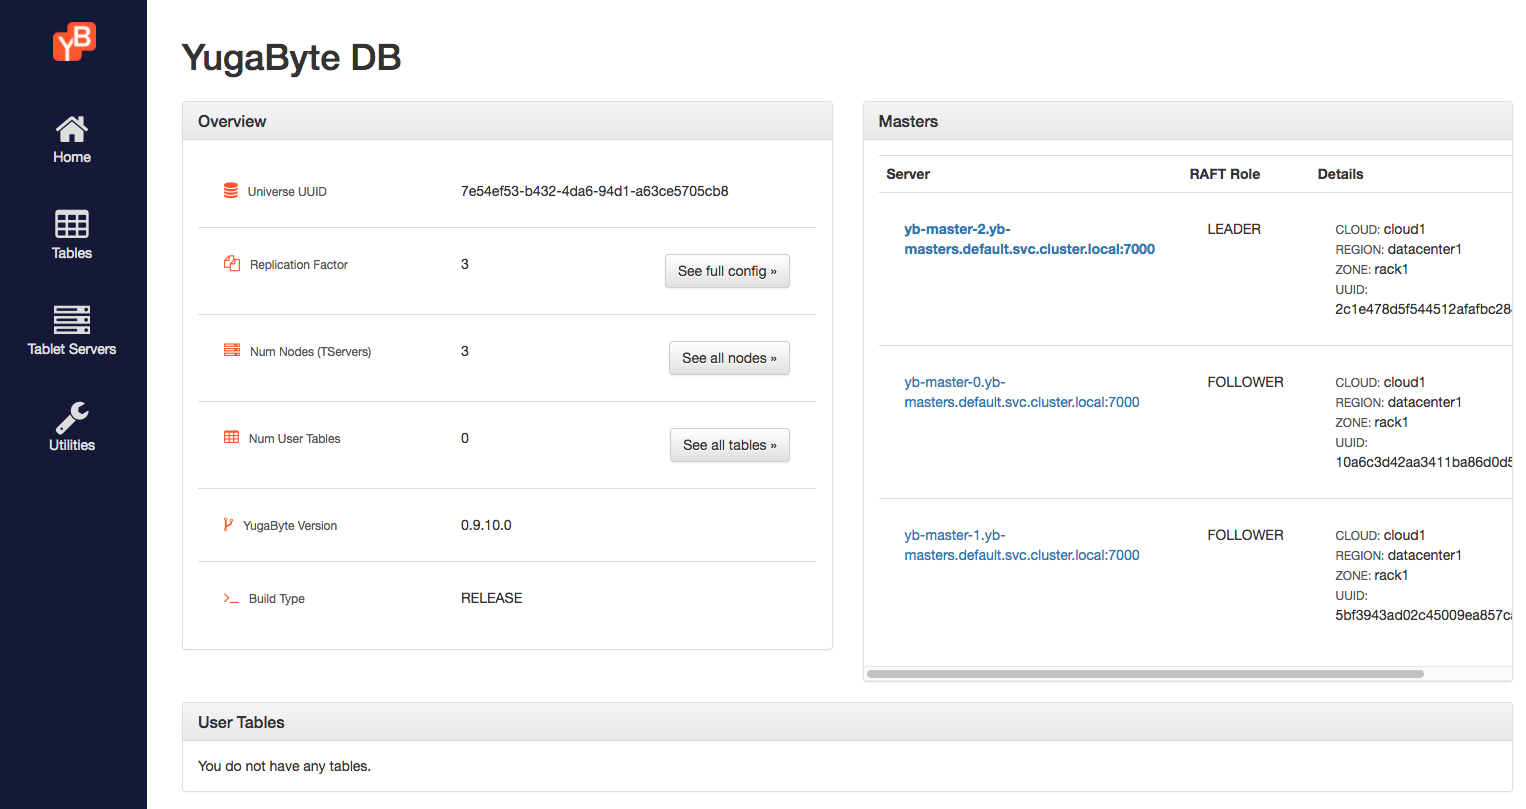
Note the yb-master-ui service above. It is a load balancer service, which exposes the YugabyteDB universe UI. You can view this by browsing to the URL http://XX.XX.XX.XX:7000. It should look as follows.
5. Connect to the universe
You can connect to one of the tserver pods and verify that the local disk is mounted into the pods.
$ kubectl exec -it yb-tserver-0 -- bash
You can observe the local disks by running the following command.
[root@yb-tserver-0 yugabyte]# df -kh
Filesystem      Size  Used Avail Use% Mounted on
...
/dev/sdb        369G   70M  350G   1% /mnt/disk0
/dev/sdc        369G   69M  350G   1% /mnt/disk1
...
You can connect to the ycqlsh shell on this universe by running the following command.
$ kubectl exec -it yb-tserver-0 -- ycqlsh yb-tserver-0
Connected to local cluster at 127.0.0.1:9042.
[ycqlsh 5.0.1 | Cassandra 3.9-SNAPSHOT | CQL spec 3.4.2 | Native protocol v4]
Use HELP for help.
ycqlsh> DESCRIBE KEYSPACES;

system_schema  system_auth  system
6. [Optional] Destroy the cluster
You can destroy the YugabyteDB universe by running the following command. Note that this does not destroy the data, and you may not be able to respawn the cluster because there is data left behind on the persistent disks.
$ kubectl delete -f https://raw.githubusercontent.com/yugabyte/yugabyte-db/master/cloud/kubernetes/yugabyte-statefulset-local-ssd-gke.yaml
You can destroy the node-pool you created by running the following command:
$ gcloud container node-pools delete node-pool-8cpu-2ssd --cluster yugabyte --zone=us-west1-b
Finally, you can destroy the entire gcloud container cluster by running the following command:
$ gcloud beta container clusters delete yugabyte --zone us-west1-b