Azure Kubernetes Service (AKS)
Deploy a single-zone YugabyteDB cluster on Azure Kubernetes Service (AKS) by following the steps below.
Microsoft's Azure Kubernetes Service offers a highly available, secure, and fully-managed Kubernetes service for developers looking to host their applications on containers in the cloud. AKS features elastic provisioning, an integrated developer experience for rapid application development, enterprise security features, and the most available regions of any cloud provider.
Prerequisites
Before you can deploy YugabyteDB on AKS, you need to verify that the following are installed and configured:
-
kubectl- For more information, see Install and Set Up kubectl.
- Kubernetes API
-
Helm 3.4 or later
- For more information, see Installing Helm.
-
Microsoft Azure account
- “Pay As You Go” enabled
Deploy YugabyteDB on an Azure Kubernetes cluster
Follow the steps below to get YugabyteDB up and running on an Azure Kubernetes cluster. The examples below are based on using the macOS.
Step 1: Install the Azure CLI
To install the Azure CLI on your local operating system, follow the instructions in Install the Azure CLI.
On your Mac, you can run the following Homebrew command to install Azure CLI:
$ brew install azure-cli
After the Azure CLI is installed, use the following command to log in at the command line:
$ az login
After entering this command, a browser window appears for you to select the Azure credentials you are using. You are logged into Microsoft Azure and can use the Azure CLI with your subscription. For more information, see Azure CLI documentation.
Step 2: Create a Resource Group**
To create a resource group, we’ll need to first choose the location where it will be hosted. Run the following command to retrieve a list of the available locations:
$ az account list-locations
For the purposes of this demo we are going to choose the “West US” location.
{
  "displayName": "West US",
  "id": "/subscriptions/53f36dd9-85d8-4690-b45b-92733d97e6c3/locations/westus",
  "latitude": "37.783",
  "longitude": "-122.417",
  "name": "westus",
  "subscriptionId": null
},
Next, create the resource group by running the following command, specifying the location:
$ az group create --name yugabytedbRG --location westus
{
  "id": "/subscriptions/53f36dd9-85d8-4690-b45b-92733d97e6c3/resourceGroups/yugabytedbRG",
  "location": "westus",
  "managedBy": null,
  "name": "yugabytedbRG",
  "properties": {
    "provisioningState": "Succeeded"
  },
  "tags": null,
  "type": "Microsoft.Resources/resourceGroups"
}
You should now be able to view showing the “yugabytedbRG” resource group in the Azure Portal by clicking Resource Groups.

Step 3: Create the Kubernetes cluster
You can now create a Kubernetes cluster by running the following command.
Note
Because you have not specified any zones in the command below, the AKS control plane components for the cluster will essentially be deployed in a single zone.$ az aks create \
--resource-group yugabytedbRG \
--name yugabytedbAKSCluster \
--node-count 3 \
--node-vm-size Standard_D4_v3 \
--enable-addons monitoring \
--generate-ssh-keys
The --generate-ssh-keys argument auto-generates SSH public and private key files that will be stored in the ~/.ssh directory.
You should see the following output:
Finished service principal creation[###################]  100.0000%
 - Running ..
You should now see ”yugabytedbAKSCluster” in the UI.

To create the cluster and use your own SSH keys, run the following command:
$ ssh-keygen -t rsa -b 2048
Follow the prompts to create theid_rsaand id_rsa.pub files and note the location where they are stored. Now, run the following command:
$ az aks create \
--resource-group yugabytedbRG \
--name yugabytedbAKSCluster \
--node-count 3 \
--node-vm-size Standard_D4_v3 \
--enable-addons monitoring \
--ssh-key-value <path_to>id_rsa.pub
After the cluster is installed, point kubectl to the cluster by running the following command:
$ az aks get-credentials --resource-group yugabytedbRG --name yugabytedbAKSCluster
You should see output similar to the following:
Merged "yugabytedbAKSCluster" as current context in /Users/yugabyte-user/.kube/config
If you generated your own SSH keys, point kubectl to the cluster by running the following command instead:
$ az aks get-credentials --resource-group yugabytedbRG --name yugabytedbAKSCluster -ssh-key-file <path_to>id_rsa
Verify that the cluster nodes are running using the following command:
$ kubectl get nodes
You should see output similar to:

You can also view the details of the cluster in the Kubernetes Dashboard by running the following commands:
First, run the following kubectl command:
$ kubectl create clusterrolebinding yb-kubernetes-dashboard --clusterrole=cluster-admin --serviceaccount=kube-system:kubernetes-dashboard --user=clusterUser
And then run the following Azure CLI command:
$ az aks browse --resource-group yugabytedbRG --name yugabytedbAKSCluster
A browser window appears where you can view the Kubernetes Dashboard:

Step 4: Install YugabyteDB using Helm Chart
Now that we have our Kubernetes cluster up and running, we'll need to perform the following steps to get YugabyteDB deployed using Helm Chart:
Add the Yugabyte charts repository
Let’s first add the YugabyteDB charts repository by running the following commands:
$ helm repo add yugabytedb https://charts.yugabyte.com
"yugabytedb" has been added to your repositories.
Now, make sure that you get the latest update from the charts repository by running the following helm command:
$ helm repo update
Hang tight while we grab the latest from your chart repositories...
...Successfully got an update from the "yugabytedb" chart repository
$ helm search repo yugabytedb/yugabyte --version 2.15.0
NAME                 CHART VERSION  APP VERSION   DESCRIPTION
yugabytedb/yugabyte  2.15.0          2.15.0.0-b11  YugabyteDB is the high-performance distributed ...
Create the namespace
To create the yb-demo namespace, run the following command.
$ kubectl create namespace yb-demo
The following message should appear:
namespace/yb-demo created
Install YugabyteDB
Next, install YugabyteDB in the yb-demo namespace by running the following commands to specify settings for resource constrained environments.
$ helm install yb-demo -n yb-demo yugabytedb/yugabyte \
 --version 2.15.0 \
 --set storage.master.count=1 \
 --set storage.tserver.count=1 \
 --set storage.master.storageClass=default \
 --set storage.tserver.storageClass=default \
 --set resource.master.requests.cpu=1 \
 --set resource.master.requests.memory=1Gi \
 --set resource.tserver.requests.cpu=1 \
 --set resource.tserver.requests.memory=1Gi \
 --set resource.master.limits.cpu=1 \
 --set resource.master.limits.memory=1Gi \
 --set resource.tserver.limits.cpu=1 \
 --set resource.tserver.limits.memory=1Gi \
 --timeout=15m
Depending on your resources, it may take some time to get everything installed, deployed, and configured.
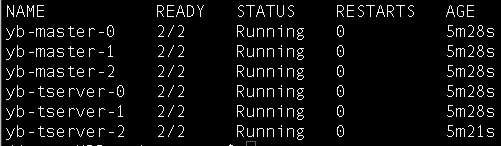
After you see a success message, you can verify that the YugabyteDB pods are running by running the following command:
$ kubectl get pods --namespace yb-demo
To access the YugabyteDB Admin UI, run the following command to locate the External IP entry associated with yb-master-ui and port 7000.
$ kubectl get services --namespace yb-demo
Now, go to http://<EXTERNAL_IP>:7000 (replacing <EXTERNAL_IP> with your external IP address). You should see the following:

You have successfully deployed YugabyteDB on an Azure Kubernetes cluster.